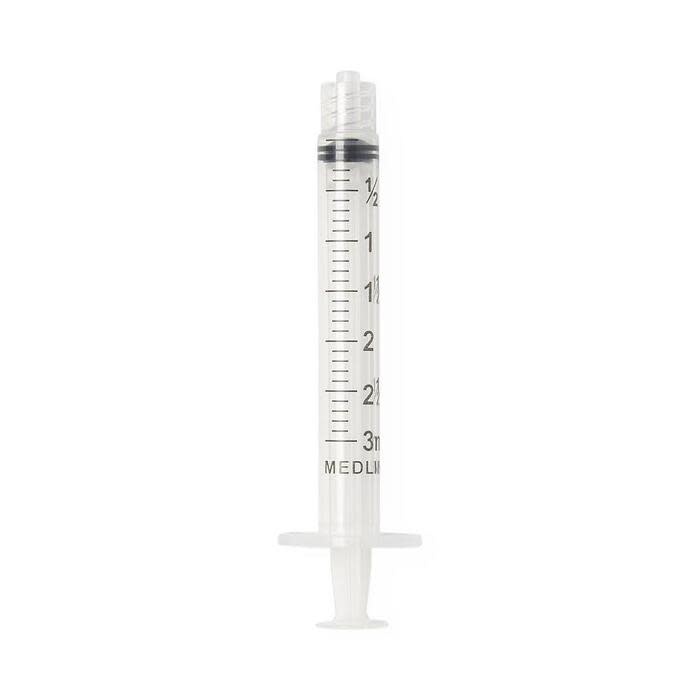
Why 3 mL Capacity with Luer Lock Connection for Precise Medical Administration
The 3 mL (3 cc) capacity represents the optimal volume for most routine medication administrations—large enough to accommodate common drug doses and dilutions while maintaining precise measurement capability with fine graduation markings (typically 0.1 mL increments). The Luer Lock threaded tip provides superior connection security compared to Luer Slip syringes, essential for high-pressure injections, procedures requiring manipulation during administration, or situations where accidental needle disconnection could compromise patient safety or create needlestick hazards for healthcare workers. This threaded connection is particularly critical when administering medications that require forceful injection (viscous solutions, small-gauge needles creating resistance), during procedures where the syringe must be repositioned without disconnecting (joint injections, some IV push medications), or when syringes must be prepared in advance and transported without risk of needle detachment. The clear polypropylene barrel with bold graduation markings ensures accurate dose measurement essential for medications with narrow therapeutic windows, pediatric dosing requiring precision, or procedures demanding exact fluid volumes like contrast media administration or specimen dilution.
Key Features & Benefits
Key Features:
- 3 mL (3 cc) barrel capacity for small to medium medication doses
- Luer Lock threaded tip for secure, twist-on needle attachment
- Clear polypropylene barrel for fluid visualization
- Bold, easy-to-read graduation markings (typically 0.1 mL increments)
- Smooth plunger with positive stop prevents accidental removal
- Latex-free construction for allergy safety
- DEHP-free materials for patient safety
- Sterile, individually packaged in peel-open wrappers
- Meets USP standards for accuracy and precision
- Compatible with all standard Luer Lock needles and accessories
- Pyrogen-free for patient safety
- Single-use, disposable design prevents cross-contamination
- Manufactured by Medline (trusted healthcare supplier)
- Cost-effective for high-volume clinical use
- Consistent quality and performance
Benefits:
- Secure Luer Lock prevents needle detachment during use
- Precise 0.1 mL graduations enable accurate small-dose measurement
- Reduces medication errors with clear, bold markings
- Smooth plunger allows controlled injection and aspiration
- Threaded connection essential for high-pressure applications
- Latex-free protects patients and staff with sensitivities
- Sterile packaging maintains infection control standards
- Versatile capacity for multiple clinical applications
- Positive stop prevents plunger loss during aspiration
- Clear barrel enables visualization of air bubbles and fluid
- Single-use eliminates sterilization needs and infection risks
- Reliable Medline quality at competitive pricing
- Universal Luer Lock compatibility with standard needles
Clinical Applications
Medline 3 mL Luer Lock syringes are appropriate for:
✓ Intramuscular medication administration (antibiotics, vaccines, hormones) ✓ Subcutaneous injections (insulin, anticoagulants, biologics) ✓ Intravenous push medications requiring controlled delivery ✓ Local anesthetic administration for minor procedures ✓ Joint injections (intra-articular corticosteroids, viscosupplementation) ✓ Trigger point injections and nerve blocks ✓ Medication reconstitution and preparation ✓ Drawing blood samples from IV lines or catheters ✓ Arterial blood gas (ABG) sample collection ✓ Contrast media administration for imaging procedures ✓ Pediatric medication dosing requiring precision ✓ Insulin administration (when insulin syringes unavailable) ✓ Medication waste removal from vials ✓ Laboratory specimen preparation and dilution ✓ Aspiration procedures (joint fluid, cysts, abscesses) ✓ Wound infiltration with anesthetics ✓ Dental anesthesia administration ✓ Veterinary medication administration
Usage & Application
Pre-Use Preparation:
- Verify order and medication:
- Confirm medication name, dose, route, patient identity
- Check patient allergies (medication and latex—though syringe is latex-free)
- Perform "5 Rights" check (right patient, medication, dose, route, time)
- Review medication compatibility and dilution requirements
- Gather supplies:
- Medline 3 mL Luer Lock syringe (verify package intact, not expired)
- Appropriate Luer Lock needle (gauge and length for intended route)
- Medication vial or ampule
- Alcohol swabs
- Clean or sterile gloves (per procedure requirements)
- Gauze pads
- Sharps container
- Additional supplies based on procedure
- Hand hygiene:
- Wash hands thoroughly with soap and water for at least 20 seconds
- Or use alcohol-based hand sanitizer if hands not visibly soiled
- Don clean or sterile gloves per facility protocol
- Inspect syringe package:
- Check sterile package for tears, moisture, or damage
- Verify expiration date
- Discard if package integrity compromised or expired
Opening Sterile Package:
- Peel-open technique:
- Grasp both sides of packaging at designated opening area
- Pull apart gently to expose sterile syringe
- Touch only barrel and plunger flange—never touch Luer Lock tip
- Remove syringe:
- Lift syringe by barrel, avoiding tip contamination
- Set on clean field if not using immediately
Attaching Luer Lock Needle:
- Select appropriate needle:
- Choose gauge and length appropriate for:
- Medication viscosity (thicker medications need larger gauge)
- Injection route (IM, SubQ, IV, intradermal)
- Patient characteristics (age, body habitus, injection site)
- Remove needle protective cap:
- Remove cap from Luer Lock needle while maintaining hub sterility
- Align threads:
- Hold syringe barrel firmly in non-dominant hand
- Align needle hub threads with syringe Luer Lock tip threads
- Twist to lock:
- Rotate needle clockwise (turn right to tighten)
- Continue twisting until firmly seated and you feel resistance
- Typically requires 1/4 to 1/2 turn
- CRITICAL: Ensure needle is fully locked—incomplete threading allows disconnection
- Verify secure connection:
- Gently tug on needle to confirm it won't separate
- Connection should be firm with no play or looseness
Drawing Medication from Vial:
- Prepare vial:
- Remove flip-off cap if new vial (don't remove rubber stopper)
- Wipe rubber stopper with alcohol swab using firm circular motion
- Allow to air dry completely (15-30 seconds)
- Draw air into syringe:
- With needle cap still on (or removed if proceeding directly)
- Pull plunger back to draw air equal to medication dose needed
- This air equalizes vial pressure and facilitates withdrawal
- Insert needle into vial:
- Hold vial upright on flat surface
- Remove needle cap
- Insert needle straight through center of rubber stopper with controlled pressure
- Inject air into vial:
- Push plunger down to inject air into vial airspace (above liquid)
- This prevents vacuum formation
- Invert vial:
- While keeping needle inserted, invert vial completely upside down
- Keep needle tip fully submerged in medication
- Withdraw medication:
- Pull plunger back slowly and steadily to draw medication
- Draw slightly past target dose initially (allows for air bubble removal)
- Remove air bubbles:
- With vial still inverted and needle still inserted:
- Tap syringe barrel firmly to move bubbles toward needle
- Push plunger slowly to expel air back into vial
- Watch medication level and readjust to exact prescribed dose
- Verify dose accuracy:
- Hold syringe at eye level
- Ensure bottom of plunger rubber (closest to needle) aligns exactly with dose marking
- Read at eye level to avoid parallax errors
- Remove needle from vial:
- Pull needle straight out of rubber stopper
- Keep needle pointing upward to prevent medication drip
Drawing Medication from Ampule:
- Prepare ampule:
- Tap top of ampule gently to move medication from neck to body
- Wipe ampule neck with alcohol swab
- Break ampule:
- Wrap neck with alcohol swab or gauze for protection
- Hold ampule body firmly
- Snap neck away from you with quick motion
- Dispose of ampule top safely
- Draw medication:
- Remove needle cap
- Insert needle into ampule opening without touching edges
- Tilt ampule to keep needle tip submerged
- Pull plunger back slowly to draw medication
- Reposition ampule/needle angle as needed to access all medication
- Remove air bubbles:
- Hold syringe upright (needle pointing up)
- Tap barrel to move bubbles to top
- Push plunger slightly to expel air
- Adjust to correct dose
- ALWAYS change needle:
- Remove drawing needle (may have glass particles)
- Attach fresh sterile needle for injection
- This prevents tissue trauma from glass fragments and ensures sharp needle for patient comfort
Preparing for Injection:
- Final air bubble check:
- Hold syringe upright with needle pointing toward ceiling
- Tap barrel gently to move any remaining bubbles to top
- Push plunger slowly until small droplet appears at needle tip
- This confirms no air blockage in needle
- Verify dose one final time:
- Check that medication level aligns with prescribed dose
- Final safety check before proceeding to patient
- Do not recap:
- If you must set syringe down before injection, use one-handed scoop technique to recap
- Preferably proceed directly to injection without recapping
Injection Technique (Route-Specific):
Intramuscular (IM) Injection:
- Select site: Deltoid (arm), vastus lateralis (thigh), ventrogluteal (hip), or dorsogluteal (buttock) per patient age and medication volume
- Position patient: Ensure muscle relaxed and site accessible
- Clean site: Wipe with alcohol swab in circular motion, allow to dry
- Stretch skin taut: Use non-dominant hand to pull skin tight over injection site (for IM, do not pinch)
- Insert needle: At 90-degree angle, insert with quick, smooth, dart-like motion to full depth
- Aspirate (per protocol): Pull back on plunger slightly to check for blood return (guidelines vary—many no longer require aspiration for vaccines)
- Inject medication: If no blood return, push plunger slowly and steadily to deliver medication
- Withdraw needle: Pull straight out quickly at same angle
- Apply pressure: Light pressure with gauze (do not massage unless specifically indicated)
Subcutaneous (SubQ) Injection:
- Select site: Abdomen, thigh, upper arm, or buttock
- Clean site: Wipe with alcohol swab, allow to dry
- Pinch skin (if needed): For average/lean patients, gently pinch subcutaneous tissue; for obese patients, may inject without pinching
- Insert needle: At 45-90 degree angle (depending on needle length and patient body habitus), insert with quick motion
- Inject medication: Push plunger slowly and steadily
- Count to 5: After plunger fully depressed, count slowly before removing needle (ensures complete delivery)
- Withdraw needle: Pull straight out
- Do not massage: Unless specifically indicated (massage can affect absorption)
Intravenous (IV) Push:
- Verify IV patency: Ensure IV catheter is patent, properly positioned, flushing without resistance
- Clean port: Scrub needleless connector or Y-site port with alcohol for 15 seconds, allow to dry
- Connect syringe: Attach Luer Lock syringe to port by twisting clockwise until secure
- Administer medication: Push medication at prescribed rate (some medications require slow push over several minutes)
- Flush line: Follow with saline flush per facility protocol
- Disconnect: Twist counterclockwise to remove syringe
Post-Injection Care:
- Do not recap: Never recap used needles with two hands (causes needlestick injuries)
- Activate safety device: If needle has safety shield, activate immediately per manufacturer instructions
- Immediate disposal: Dispose of entire syringe-needle assembly in sharps container immediately after use
- Remove gloves and hand hygiene: Remove gloves properly, wash hands
- Document administration:
- Medication name, dose, route, site
- Date and time
- Patient response
- Any adverse reactions
- Monitor patient: Observe for adverse reactions, especially with first doses or high-alert medications
Special Applications:
Joint Injections (Intra-articular):
- Requires sterile technique and appropriate positioning
- Luer Lock essential (prevents disconnection during repositioning)
- May need to aspirate joint fluid before injecting medication
- Typically performed by physicians or advanced practitioners
Arterial Blood Gas (ABG) Sampling:
- Requires heparinized syringe (may need to draw heparin into syringe first)
- Special technique for arterial puncture
- Expel air bubbles immediately (air alters results)
- Place on ice immediately after collection
Blood Sample from IV Line:
- Discard initial 5 mL waste (contains diluted blood/IV fluid)
- Draw required sample volume
- Flush line after sampling
Troubleshooting:
Needle won't attach or feels loose:
- Verify you have Luer Lock needle (not Luer Slip—won't thread)
- Ensure you're twisting clockwise (right to tighten)
- Check threads aren't damaged on syringe tip or needle hub
- Continue twisting until you feel definite resistance
- If threads stripped, discard and use new syringe
Needle detaches during use:
- Indicates incomplete threading initially
- Always verify secure attachment before proceeding
- Tighten by twisting clockwise if looseness detected
- If needle detaches, discard both pieces safely, start over with new supplies
Difficulty drawing medication from vial:
- Ensure adequate air was injected to equalize pressure
- Check needle tip is submerged in medication
- Vial may have vacuum—inject additional air
- For viscous medications, may need larger gauge needle
- Pull plunger slowly and steadily (not too fast)
Air bubbles won't move to top:
- Hold syringe perfectly vertical (needle straight up)
- Tap more firmly on barrel
- Flick barrel with fingernail to dislodge stubborn bubbles
- Tiny bubbles (1-2 pinhead size) generally not harmful for IM/SubQ but remove when possible
Plunger difficult to move:
- Unusual for Medline syringes—indicates possible defect
- May have been stored in extreme temperatures
- If plunger sticks or moves roughly, discard and use new syringe
- Never force resistant plunger
Medication leaks at needle hub:
- Verify Luer Lock connection is fully tightened
- Check for cracks in hub or syringe tip
- May need to tighten further by twisting clockwise
- If cracked, discard and use new supplies
Can't read graduation markings:
- Use adequate lighting
- Hold at eye level
- Clean barrel with alcohol swab if fingerprints present
- Consider magnification if vision impaired
- Ensure you're reading correct scale (mL/cc)
Resistance when injecting:
- May indicate needle gauge too small for medication viscosity
- Could indicate subcutaneous rather than IM placement (more resistance)
- Needle may be against bone or dense tissue—withdraw slightly
- Never force injection against high resistance
Special Considerations:
Pediatric patients:
- 3 mL size appropriate for most pediatric doses
- Calculate doses carefully (weight-based dosing)
- Use smallest appropriate gauge needle
- Consider topical anesthetic before injection
- Use distraction techniques during procedure
- Have assistant help restrain if needed
- Vastus lateralis preferred site for infants/young children
Geriatric patients:
- May have decreased muscle mass—assess injection site carefully
- Skin may be thin and fragile
- May bruise more easily
- May be on anticoagulants (apply pressure longer)
- Ensure adequate lighting for dose preparation (vision may be impaired)
- Provide clear instructions if patient self-administers
Anticoagulated patients:
- Apply pressure longer after injection (3-5 minutes)
- Monitor for hematoma formation
- SubQ injections preferred over IM when possible (less bleeding risk)
- Avoid massage of injection site
Obese patients:
- May need longer needles for IM injections (standard 1" needle may not reach muscle)
- Assess subcutaneous tissue thickness
- Consider alternate sites with less adipose tissue
Patients with needle anxiety:
- Explain procedure clearly
- Use distraction techniques
- Quick needle insertion less painful than slow
- Smaller gauge needles when medication viscosity allows
- Topical anesthetic for some procedures
High-alert medications:
- Double-check calculations and dose with second nurse
- Verify concentration carefully
- Use independent double-check for high-alert drugs
- Document per facility high-alert medication protocols
Storage:
- Store at room temperature 15-30°C (59-86°F)
- Protect from extreme heat, cold, or direct sunlight
- Keep in original packaging until use to maintain sterility
- Store in clean, dry area
- Inspect packages before use—discard if damaged
- Check expiration dates—rotate stock using FIFO method
- Do not use expired syringes (sterility not guaranteed)
Disposal:
- Dispose of entire syringe-needle assembly in sharps container immediately after use
- Do NOT separate needle from syringe before disposal (increases injury risk)
- Do NOT recap needles using two hands (use one-handed scoop only if absolutely necessary)
- Never place used syringes in regular trash or recycling
- When sharps container 3/4 full, seal and dispose per local regulations
- Many pharmacies and hospitals offer sharps disposal programs
Infection Control:
- Always use aseptic technique for medication preparation
- Never reuse syringes—single-use only
- Never use syringe for multiple patients even if changing needles
- Discard syringes from opened or damaged packages
- Clean vial tops with alcohol before each access
- Use new sterile syringe and needle for each injection
- Follow facility protocols for multi-dose vial access
When to Contact Healthcare Provider or Pharmacy:
- Questions about appropriate needle size for specific medication
- Uncertainty about medication compatibility or dilution
- Need for clarification on injection technique
- Damaged or defective syringes received
- Medication dosing questions
- Adverse reactions after medication administration
Regulatory Compliance:
- Medline syringes meet FDA 21 CFR 880.5860 requirements for piston syringes
- Manufactured in FDA-registered facilities
- Meet USP standards for accuracy and sterility
- Comply with ISO 7886-1 international standards for sterile syringes
- Latex-free to comply with healthcare safety requirements
- DEHP-free for patient safety
Technical Specifications
Product Details:
- Manufacturer: Medline Industries, Inc.
- Product Type: General-purpose medical syringe with Luer Lock tip
- Capacity: 3 mL (3 cc)
- Tip Type: Luer Lock (threaded tip for secure needle attachment)
- Graduation Markings: Bold black printed graduations
- Typically 0.1 mL increments (allowing 0.1 mL precision)
- Major lines every 0.5 mL or 1 mL (product dependent)
- Numbers clearly marked for easy reading
- Barrel Material: Clear medical-grade polypropylene
- Plunger Material: Medical-grade polypropylene with elastomeric seal
- Plunger Type: Positive stop prevents accidental removal during aspiration
- Sterility: Sterile, individually packaged in peel-open wrappers
- Sterilization Method: Ethylene oxide (EtO) or gamma radiation (per lot)
- Latex Content: Latex-free (no natural rubber latex in syringe or packaging)
- DEHP Content: DEHP-free (no phthalate plasticizers)
- Pyrogen Status: Non-pyrogenic (pyrogen-free)
- Needle Included: No (needles sold separately)
- Needle Compatibility: All standard Luer Lock needles and accessories
- Expiration: Typically 5 years from manufacture date (check individual packages)
- Packaging: Varies (typically boxes of 100 or other quantities—verify with supplier)
- Individual Packaging: Sterile peel-open wrapper
- Intended Use: Medication preparation and administration in clinical, hospital, laboratory, or home-care settings
- Patient Population: All ages with appropriate needle selection
- Regulatory Status: FDA-cleared medical device, Class II
- Standards Compliance:
- Meets USP Chapter <381> standards for elastomeric closures
- ISO 7886-1 sterile syringes for single use
- Graduated accuracy: ±5% per USP requirements
- Country of Origin: Varies (check package labeling)

 780 409-1509
 Get directions