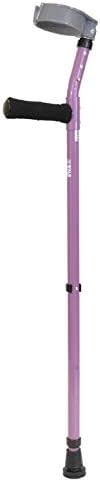
Why 4-Inch Full Cuff Design?
The 4-inch diameter full cuff represents a critical advancement over half-cuff or no-cuff crutch designs by providing circumferential forearm containment that distributes weight-bearing forces across a larger surface area. Traditional underarm crutches concentrate pressure on the axillary region, creating risk for nerve damage and circulatory compromise, while half-cuff forearm crutches offer minimal lateral stability during dynamic movements. The full-cuff configuration encircles the forearm just below the elbow, creating a biomechanically superior weight transmission system that engages both the forearm musculature and skeletal structure. This design reduces distal hand grip force requirements by 30-40% compared to half-cuff models, as the cuff acts as a secondary support point that shares load distribution. For users with compromised hand strength from arthritis, carpal tunnel syndrome, or neurological conditions affecting grip, this dual-point support system enables sustained ambulation that would be impossible with grip-dependent mobility aids. The 4-inch width provides optimal balance between support surface area and freedom of arm movement, preventing both inadequate stabilization (smaller cuffs) and restricted joint mobility (oversized cuffs). This cuff dimension accommodates the natural contours of adult forearms while maintaining sufficient clearance for clothing layers, orthoses, or medical devices.
Key Features
- 4-Inch Full Cuff Design: Circumferential forearm containment (10 cm diameter) provides stable weight distribution and lateral stability during ambulation
- Adjustable Height Configuration: 28-40 inch range (grip to floor) accommodates adult users from 5'0" to 6'2" with proper ergonomic alignment
- Soft Ergonomic Grips: Cushioned rubber/foam handle surface reduces palm pressure and prevents callus formation during extended use
- Bold Purple Finish: High-visibility color enhances safety awareness while providing personalized aesthetic expression
- 300-lb Weight Capacity: Structural aluminum tubing supports average to above-average adult body weights with confidence
- Epoxy-Coated Aluminum Construction: Lightweight durable frame (approximately 2-3 lbs per crutch) balances strength and maneuverability
- Secure Height Adjustment System: Push-pin locking mechanism ensures precise height settings without slippage during weight-bearing
- Replaceable Rubber Tips: Standard crutch tip design allows periodic replacement as tread wears for maintained traction
Benefits
- Superior Weight Distribution: Full cuff shares load between hand grip and forearm, reducing grip force requirements by 30-40% compared to half-cuff designs
- Enhanced Stability: Circumferential cuff prevents lateral forearm displacement during weight transfer, improving confidence on uneven terrain
- Reduced Upper Extremity Fatigue: Dual-point support system (grip + cuff) decreases muscle strain in hands, wrists, and forearms during prolonged use
- Improved Postural Alignment: Proper height adjustment enables upright trunk positioning, preventing the forward-leaning posture common with poorly fitted crutches
- Increased Ambulation Endurance: Reduced fatigue and improved comfort enable longer walking distances, supporting community mobility and independence
- Nerve Protection: Eliminates axillary nerve compression risk associated with underarm crutches, preventing brachial plexus injury
- Personal Style Expression: Purple color provides individuality and high visibility, reducing stigma while enhancing safety in traffic
- Long-Term Durability: Epoxy-coated aluminum resists corrosion and maintains structural integrity through years of daily use
- Versatile Application: Suitable for temporary recovery (6-12 weeks) or permanent mobility needs depending on underlying condition
Clinical Applications
✓ Lower extremity fractures requiring partial or non-weight-bearing protocols (ankle, foot, tibia)
✓ Post-operative orthopedic recovery (hip replacement, knee reconstruction, ligament repair)
✓ Spinal cord injury with incomplete paralysis maintaining upper extremity strength
✓ Cerebral palsy with lower limb involvement but functional upper extremities
✓ Multiple sclerosis with lower extremity weakness but preserved arm function
✓ Muscular dystrophy affecting legs while arms retain functional capacity
✓ Polio survivors with residual lower limb paralysis
✓ Amputation recovery during prosthetic fitting and gait training phases
✓ Arthritis affecting lower extremities (knees, hips, ankles) requiring offloading
✓ Neurological conditions with lower limb weakness (peripheral neuropathy, Guillain-Barré)
✓ Stroke survivors with hemiplegia (when bilateral crutch use appropriate)
✓ Chronic pain syndromes requiring lower extremity load reduction
✓ Obesity-related joint degeneration requiring mechanical assistance
✓ Gait training for balance disorders with adequate upper body strength
✓ Permanent mobility impairment in young active adults prioritizing function over appearance
✓ Sports injuries requiring extended non-weight-bearing periods (stress fractures, ligament tears)
Usage & Application
Initial Fitting and Height Adjustment: Stand upright in typical footwear on a level surface. With arms hanging naturally at sides, position the crutch vertically beside the body with the tip approximately 6 inches lateral to the foot and 6 inches forward. Adjust the height mechanism so the hand grip aligns precisely with the wrist crease when the arm is relaxed. This positioning ensures 15-20 degrees of elbow flexion when gripping the handle, which optimizes force transmission while minimizing joint strain. The forearm cuff should sit 1-2 inches below the elbow when the hand grips the handle, typically positioned at the upper third of the forearm. If the cuff contacts the elbow prominently, lower the crutch; if it sits near mid-forearm, raise the crutch. Verify that the push-pin adjustment locks securely by attempting to compress the crutch with moderate downward pressure. Both crutches must be adjusted to identical heights to ensure balanced weight distribution and symmetrical gait mechanics.
Cuff Positioning and Comfort: Insert the forearm through the open side of the cuff so the opening faces outward (away from the body midline). This orientation prevents the cuff from catching on clothing or furniture during swing-through movements. The cuff should encircle the forearm snugly without excessive pressure; you should be able to fit one or two fingers between the cuff and forearm when standing relaxed. Excessively tight cuffs can restrict circulation and cause discomfort, while loose cuffs allow forearm displacement that compromises stability. For users with larger or smaller forearms, some models offer adjustable cuff openings; verify this feature if standard cuff sizing feels uncomfortable. The cuff material should contact the forearm without chafing; if irritation occurs, consider adding a thin cotton sleeve or arm warmer as an interface layer.
Grip Technique: Place the palm firmly on the soft ergonomic grip with fingers wrapped around the handle and thumb positioned on top or slightly to the side, whichever feels more natural. Avoid gripping excessively tight, as this increases forearm muscle fatigue and can lead to repetitive strain injuries. The proper grip involves moderate pressure sufficient to maintain control without white-knuckling the handle. The soft cushioning should compress slightly under palm pressure, indicating appropriate weight distribution. During weight-bearing phases, coordinate grip force with cuff support so both contact points share the load rather than relying solely on hand strength. This coordination develops naturally over several days of use as muscle memory establishes the optimal balance.
Standard Gait Patterns: For non-weight-bearing protocols where one leg cannot touch the ground, use the swing-through pattern: advance both crutches simultaneously approximately 12-18 inches forward, transfer weight onto the crutches through combined grip and cuff support, then swing the body forward past the crutch position while the affected leg remains elevated. Land gently on the unaffected leg and repeat. This pattern requires significant upper body strength but provides complete offloading of the injured limb. For partial weight-bearing where some load is permitted, use the three-point gait: advance both crutches and the affected leg simultaneously, transfer weight onto the crutches and partially onto the affected leg (following physician weight-bearing restrictions), then step through with the unaffected leg. This pattern allows progressive loading as healing occurs.
Stair Navigation: When ascending stairs with forearm crutches, lead with the stronger leg. Grip the handrail with one hand if available and hold both crutches in the opposite hand (tucked under the arm or held together). Step up with the strong leg first, then bring the weak leg and crutches up to the same step. If no handrail is available or you prefer independent ascent, maintain both crutches in proper position and use upper body strength to push upward while stepping up with the strong leg. When descending stairs, reverse the pattern by placing both crutches down on the lower step first, then lowering the weaker leg, followed by the stronger leg stepping down. The mnemonic "up with the good, down with the bad" helps remember stair technique. Take stairs slowly and deliberately, as rushing increases fall risk significantly.
Sitting and Standing Transitions: When preparing to sit, back up to the chair until you feel it contact your legs. Transfer both crutches to one hand by tucking them under the arm on your stronger side. Reach back with the free hand to grip the armrest or seat edge. Lower slowly into the seat by bending the strong leg while keeping the affected leg extended forward. Once seated, lean the crutches against a nearby wall or surface where they won't fall or create a tripping hazard. When rising, reverse the process: scoot forward to the edge of the seat, place both feet on the floor (or the strong foot if non-weight-bearing), position both crutches on the stronger side, push up from the chair armrest with one hand while using the crutches for additional support. Stand fully before inserting forearms into the cuffs and resuming ambulation.
Outdoor and Uneven Terrain Use: On outdoor surfaces such as grass, gravel, or cracked pavement, shorten your stride length and advance the crutches more deliberately to ensure firm placement before weight transfer. The standard rubber tips provide reasonable traction on most surfaces but may slip on wet grass, loose gravel, or icy conditions. Consider ice pick tip attachments during winter months if regional climate necessitates snow and ice navigation. When encountering curbs, treat them as single-step obstacles: place crutch tips on the upper level, then step up with the strong leg, bringing the weak leg up after. Avoid attempting to navigate significant obstacles (4+ inches) without assistance until proficient in basic crutch use. Cross streets at designated crosswalks only, as hurrying across traffic while using crutches increases fall risk substantially.
Energy Conservation: Forearm crutch use demands significant energy expenditure, typically increasing caloric burn by 30-50% compared to normal ambulation. New users often experience shoulder, arm, and core muscle soreness during the first week as muscles adapt to unfamiliar demands. Pace activities appropriately by taking frequent rest breaks, especially during the initial adjustment period. Plan routes that minimize distance and incorporate seating opportunities. Consider using a small backpack or messenger bag to carry items, as hand-carrying objects while using crutches compromises stability. For longer outings, wheelchair use may be more appropriate to conserve energy for essential activities.
Maintenance and Safety Inspection: Before each use, inspect rubber tips for wear, cracks, or embedded debris that could compromise traction. Replace tips when tread depth diminishes to less than 2mm or when wear indicators (if present) become visible. Check height adjustment pins monthly to ensure they seat fully in adjustment holes without wobbling. Examine the cuff structure for cracks or separation from the mounting hardware that could lead to catastrophic failure during weight-bearing. Clean epoxy-coated aluminum tubing with mild soap and water; avoid abrasive cleaners or solvents that could damage the purple finish. Inspect soft grips for surface degradation; replace if the cushioning becomes compressed, torn, or develops a slippery surface. Store crutches in a dry location away from temperature extremes that could degrade rubber components or weaken adhesive bonds. Never modify crutches by drilling additional adjustment holes or altering structural components, as this voids safety certifications and creates injury risk.
Skin Protection and Blister Prevention: During the first week of crutch use, forearm and hand skin adapts to friction and pressure, often developing minor irritation or blisters. Wear long sleeves to provide a fabric interface between skin and cuff, reducing friction. Keep hands clean and dry, as moisture increases blister risk. If redness develops on the forearm, apply moleskin or adhesive foam padding to the cuff interior at the pressure point. For palm blisters, use sports tape or specialized blister prevention products before they develop. Once blisters form, protect them with hydrocolloid dressings that provide cushioning while promoting healing. If skin breakdown becomes significant or infection signs develop (increased warmth, redness spreading beyond the blister, purulent drainage), discontinue crutch use temporarily and consult a healthcare provider.
Progressive Gait Training: If using forearm crutches long-term, work with a physical therapist to optimize gait mechanics and prevent compensatory movement patterns that could lead to secondary injuries. Common issues include excessive trunk lateral lean, asymmetric weight bearing between crutches, insufficient elbow extension during push-off, and inadequate forward placement of crutches. Video analysis can identify these deviations for correction. As strength and coordination improve, therapists may progress users to more advanced patterns such as four-point gait (alternating crutch and leg advancement) or modified reciprocal patterns that more closely simulate normal walking. Proper technique not only improves efficiency but significantly reduces upper extremity overuse injury risk.
Technical Specifications
Model Information
Model: WalkEasy Forearm Crutch with 4-Inch Full Cuff
Color: Purple (Bold)
Sold As: Pair (2 crutches)
Weight Capacity: 300 lbs (136 kg)
Cuff Specifications
Cuff Type: Full circumferential design
Cuff Diameter: 4 inches (10 cm)
Cuff Opening: Outward-facing for easy arm insertion
Cuff Material: Molded durable composite or metal with padding (model-specific)
Cuff Position: Adjustable relative to grip (typically 1-2 inches below elbow)
Height Adjustment Range
Grip-to-Floor Height: 28-40 inches (71-102 cm) adjustable
Suitable User Height: Approximately 5'0" to 6'2" (152-188 cm)
Adjustment Increment: 1-inch intervals (typical)
Locking Mechanism: Push-pin system with secure hole engagement
Number of Adjustment Positions: 12-13 positions (typical)
Construction Materials
Frame: Epoxy-coated aluminum alloy tubing
Finish: Purple powder-coat or epoxy coating
Grip: Soft rubber or foam ergonomic handle with cushioning
Tip: Replaceable rubber crutch tip with treaded bottom
Hardware: Corrosion-resistant steel pins and fasteners
Cuff Hardware: Metal or reinforced composite mounting brackets
Dimensions and Weight
Crutch Weight: Approximately 2-3 lbs per crutch (0.9-1.4 kg)
Pair Weight: Approximately 4-6 lbs total (1.8-2.7 kg)
Shaft Diameter: Standard 7/8-inch to 1-inch tubing
Tip Diameter: Approximately 7/8-inch rubber contact surface
Functional Specifications
Support Type: Forearm crutch (not underarm)
Cuff Style: Full circumferential, open-sided for easy donning
Grip Style: Ergonomic contoured with soft cushioning
Weight Distribution: Shared between hand grip and forearm cuff
Intended Use: Temporary or permanent mobility assistance for adults
Compliance and Standards
Intended User: Adults requiring forearm crutch support with adequate upper extremity strength
Environment: Indoor and outdoor use on stable surfaces
Load Testing: Meets standard mobility aid structural requirements
Maintenance: Periodic tip replacement and hardware inspection required
Package Contents
2 WalkEasy Forearm Crutches with 4-inch full cuffs (Purple)
2 Standard rubber tips (pre-installed)
2 Soft ergonomic grips (pre-installed)
Height adjustment hardware (pre-assembled)
User manual with fitting and safety instructions
 780 409-1509
 Get directions