Why Closed System Design with Integrated Extension Set for Safer IV Access
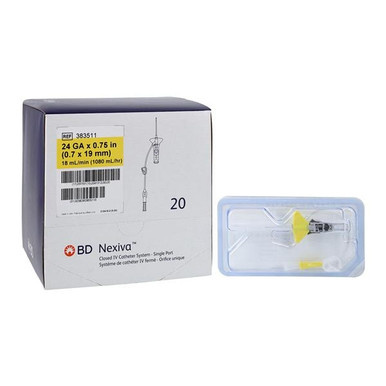
The BD Nexiva closed IV catheter system revolutionizes peripheral IV insertion by eliminating the blood exposure risks inherent in traditional open catheter systems—the pre-attached extension tubing with integrated valve technology prevents blood reflux during insertion, protecting healthcare workers from needlestick injuries and blood contamination while maintaining sterile technique. The 24-gauge catheter (0.7mm outer diameter) with 3/4-inch (19mm) length is specifically designed for fragile, small, or difficult veins commonly encountered in pediatric patients, elderly adults, oncology patients with compromised vasculature, and any patient requiring gentle venous access where larger catheters would cause excessive trauma or insertion failure. The integrated stabilization platform distributes catheter weight and reduces pistoning (in-and-out catheter movement) that causes mechanical phlebitis and catheter failure, extending dwell time and reducing painful restarts. The dual-port V-Link connector allows simultaneous infusions without additional equipment, while the single-handed insertion technique with push-button activation streamlines the insertion process and improves first-stick success rates compared to conventional IV catheters.
Key Features & Benefits
Key Features:
- 24-gauge (24G) catheter with 0.7mm outer diameter for delicate veins
- 3/4-inch (0.75", 19mm) catheter length for peripheral access
- Closed system design with integrated extension set (6-7 inches)
- Pre-attached stabilization platform for secure catheter securement
- Blood control technology prevents blood reflux during insertion
- Dual-port V-Link connector for simultaneous infusions
- Push-button safety mechanism retracts needle after insertion
- Notched needle technology for improved blood visualization
- Transparent stabilization platform allows insertion site monitoring
- Yellow color-coded hub for 24G identification (ISO standard)
- FEP (fluorinated ethylene propylene) catheter material for biocompatibility
- Vialon™ biomaterial softens in vein, reducing mechanical irritation
- Integrated extension tubing eliminates need for separate add-on device
- Single-handed insertion capability improves technique control
- Pre-primed blood control valve eliminates extra flushing step
- Latex-free construction for allergy safety
- DEHP-free materials for patient safety
- Sterile, individually packaged for infection control
- Compatible with standard IV administration sets and syringes
Benefits:
- Protects healthcare workers from blood exposure and needlestick injuries
- Reduces insertion-related phlebitis through advanced stabilization
- Extends catheter dwell time (average 30-50% longer than traditional catheters)
- Decreases painful catheter restarts and patient discomfort
- Improves first-stick success rates with better visualization
- Streamlines insertion workflow with integrated components
- Reduces risk of catheter-related bloodstream infections (CR-BSI)
- Appropriate gauge for fragile veins without excessive trauma
- Dual ports accommodate complex medication regimens
- Transparent platform enables visual infection monitoring
- Single-handed technique frees other hand for patient support
- Color coding prevents gauge selection errors
- Softer catheter material reduces vein irritation
- Pre-assembled design saves setup time
- Cost-effective through reduced complications and longer dwell time
Clinical Applications
BD Nexiva 24G × 3/4" closed IV catheters are appropriate for:
✓ Pediatric IV access (infants over 3kg, children, adolescents) ✓ Geriatric patients with fragile, thin-walled veins ✓ Oncology patients with compromised vasculature from chemotherapy ✓ Patients requiring gentle venous access (small or fragile veins) ✓ Hand and distal forearm vein access ✓ Patients with difficult IV access requiring smaller gauge ✓ Maintenance fluid therapy and hydration ✓ Continuous medication infusions (antibiotics, analgesics) ✓ Intermittent medication administration ✓ Blood sample collection from peripheral IV lines ✓ Patients requiring extended peripheral IV therapy (3-7 days) ✓ Ambulatory patients needing mobility during IV therapy ✓ Outpatient infusion center treatments ✓ Emergency department stabilization and treatment ✓ Operating room IV access for minor procedures ✓ Post-anesthesia care unit (PACU) monitoring ✓ Home healthcare IV therapy ✓ Hospice and palliative care IV access ✓ Dialysis access-site preservation (use non-fistula arm)
Usage & Application
Pre-Insertion Preparation:
- Verify order and assess patient:
- Confirm IV therapy is ordered (fluids, medications, blood products)
- Review patient allergies (iodine, chlorhexidine, adhesives, latex)
- Assess for contraindications (infection at site, lymphedema, arteriovenous fistula, previous mastectomy on same side)
- Review patient history (diabetes, anticoagulation, previous IV difficulties)
- Explain procedure to patient to reduce anxiety and gain cooperation
- Select appropriate catheter:
- 24G × 3/4" suitable for: fragile veins, pediatric patients, elderly, hand/distal veins, maintenance fluids
- Consider larger gauge (20G-22G) if: rapid fluid resuscitation needed, blood transfusion planned, viscous medications
- Consider longer length (1" to 1.25") if: deeper veins, edema present, obese patients
- Gather supplies:
- BD Nexiva 24G × 3/4" catheter (verify package intact and not expired)
- Tourniquet (single-use preferred)
- Chlorhexidine or alcohol antiseptic (per facility protocol)
- Sterile gauze pads
- Transparent semipermeable dressing (Tegaderm or similar)
- Sterile gloves (or clean gloves per facility protocol)
- Normal saline flush syringes (10 mL prefilled syringes)
- IV administration set primed with ordered fluid
- Sharps container
- Tape or securement device
- Documentation materials
- Hand hygiene:
- Wash hands thoroughly with soap and water for at least 20 seconds
- Or use alcohol-based hand sanitizer if hands not visibly soiled
- Don clean or sterile gloves per facility protocol
- Patient positioning:
- Position patient comfortably with selected arm extended
- Ensure adequate lighting for vein visualization
- Place absorbent pad under arm (blood control reduces but doesn't eliminate all blood exposure)
Vein Selection and Assessment:
- Apply tourniquet:
- Place tourniquet 4-6 inches (10-15 cm) above intended insertion site
- Tight enough to impede venous return but not arterial flow
- Should still be able to palpate distal pulse
- Ask patient to open and close fist several times (pumps blood into veins)
- Vein assessment criteria:
- Palpation more important than visualization
- Look for veins that are:
- Straight (at least 1-2 inches of straight vein for catheter length)
- Springy and bouncy when palpated (indicates good vein health)
- Easily palpable (can feel vein roll under finger)
- Adequate size for 24G catheter
- Avoid veins that are:
- Hard, cordlike, or sclerosed (from previous IV use or damage)
- Over joints (increases catheter dislodgement)
- In areas of bruising, infection, or skin breakdown
- Bifurcated (branching veins complicate threading)
- Near arterial pulse (risk of arterial puncture)
- Preferred vein sites for 24G × 3/4" catheter:
- Best choices:
- Dorsal metacarpal veins (back of hand)
- Cephalic vein (thumb side of wrist and forearm)
- Basilic vein (pinky side of forearm)
- Median antebrachial veins (center forearm)
- Acceptable if necessary:
- Dorsal digital veins (fingers—only if absolutely necessary)
- Avoid:
- Antecubital fossa (inside of elbow)—reserve for blood draws or emergency
- Lower extremities in adults (increased DVT and infection risk)
- Affected arm after mastectomy or with AV fistula
- Areas with compromised circulation
Nexiva Catheter Inspection and Preparation:
- Open sterile package:
- Check package integrity—discard if damaged or wet
- Verify catheter gauge (24G, yellow hub) and length (3/4")
- Check expiration date
- Open package using aseptic technique
- Inspect catheter components:
- Verify extension set is properly attached to catheter hub
- Check that V-Link dual ports are present and caps intact
- Ensure stabilization platform is securely attached
- Verify push-button safety mechanism is in locked position (not activated)
- Check for any visible defects (bent catheter, loose connections)
- Prime extension set (if needed):
- Some Nexiva systems come pre-primed with saline
- If not pre-primed: attach saline flush syringe to one port, open clamp, flush to remove air
- Close clamp after priming
- Note: Blood control valve may require minimal priming or may self-prime during insertion
Site Preparation:
- Clean insertion site:
- Chlorhexidine (preferred): Apply with friction using back-and-forth strokes for 30 seconds, allow to dry completely (30 seconds)
- 70% alcohol (alternative): Apply with friction in concentric circles from center outward, allow to dry completely (30 seconds)
- Do NOT touch site after cleaning (recontaminates site)
- Do NOT blow on site or fan to dry faster (introduces bacteria)
- Maintain venous distention:
- Keep tourniquet in place until catheter successfully inserted
- Ensure tourniquet hasn't loosened during site preparation
- Patient may continue making fist intermittently if needed
Nexiva Insertion Technique:
- Hold catheter correctly:
- Grasp Nexiva catheter by the stabilization platform "wings" with dominant hand
- Position thumb near push button (ready to activate after insertion)
- Rest hand on patient's arm for stability (single-handed technique)
- Stabilize vein:
- Use non-dominant hand to anchor skin and vein below insertion site
- Apply gentle traction to prevent vein from rolling
- Stretch skin taut
- Insert catheter:
- Position needle bevel up (you can see the bevel through transparent catheter)
- Insert at 10-30 degree angle to skin (shallow angle for superficial veins, slightly steeper for deeper veins)
- Use smooth, controlled motion—not too fast or too slow
- Advance until you see primary blood flash in catheter hub (confirms vein entry)
- Lower angle and advance:
- Once primary flash appears, immediately lower catheter angle to nearly parallel with skin
- Advance entire catheter and needle approximately 1-2mm further into vein (ensures catheter tip fully in vein lumen)
- Thread catheter:
- While holding needle stabilizer steady, advance catheter only by sliding catheter hub forward
- You should see secondary blood flash travel into integrated extension tubing (confirms catheter fully advanced in vein)
- Advance catheter smoothly until hub reaches skin—do NOT force
- Note: Blood control technology may limit visible blood flash in tubing—this is normal
- Release tourniquet:
- Before needle removal, release tourniquet with non-dominant hand
- This reduces venous pressure and blood backflow risk
- Activate safety mechanism:
- Press push button firmly with thumb
- You will hear/feel a click as needle retracts into safety chamber
- Needle is now safely locked and cannot re-extend
- Catheter remains in place—only needle retracts
- Apply gentle pressure:
- While keeping stabilization platform in place, apply light pressure over vein just above catheter tip (through skin, not directly on catheter)
- This occludes vein and minimizes blood leakage when connecting IV tubing
Connection and Securing:
- Connect IV tubing or flush:
- Remove protective cap from one V-Link port
- Connect primed IV administration set OR saline flush syringe
- If using flush: slowly inject 3-5 mL saline while watching for infiltration signs (swelling, coolness, pain)
- If using continuous IV: open roller clamp to establish flow
- Verify patency:
- Observe for swelling: No swelling at site = catheter properly in vein
- Assess resistance: Flush should inject smoothly with no resistance
- Check blood return: Gently aspirate to verify blood return (if possible—blood control valve may limit this)
- Patient comfort: Ask patient about pain/discomfort—burning or severe pain indicates infiltration
- Secure catheter:
- Integrated stabilization platform:
- Press platform firmly onto skin—adhesive on bottom secures catheter
- Platform distributes weight and prevents catheter movement
- Apply transparent dressing:
- Center transparent semipermeable dressing (Tegaderm) over insertion site and platform
- Dressing should allow visualization of insertion site
- Smooth out wrinkles (wrinkles create moisture pockets)
- Loop and secure extension tubing:
- Create strain relief loop in extension tubing
- Secure with tape to prevent tugging on catheter
- Label catheter:
- Document gauge, length, insertion date/time on dressing label
- Per facility policy, may include inserter initials
- Dispose of needle:
- Immediately place retracted needle assembly in sharps container
- Do NOT set down on surfaces
- Never attempt to recap or manipulate used needle
Post-Insertion Care:
- Remove gloves and perform hand hygiene.
- Document insertion:
- Date and time of insertion
- Site location (specific vein and anatomical location)
- Catheter gauge and length
- Number of insertion attempts
- Patient tolerance
- Ease of insertion
- Appearance of insertion site
- Type of dressing applied
- Initiating fluids or medications
- Educate patient:
- Instruct to report: pain, burning, swelling, redness, dampness, loose dressing
- Advise to protect IV site during movement and activities
- Explain not to pull on tubing
- Encourage to keep site dry during hygiene
- Set monitoring schedule:
- Assess catheter site at least every 4 hours during continuous infusion
- Assess before each intermittent medication administration
- Document site condition each shift
Ongoing Catheter Maintenance:
- Site assessment (every 4 hours and with each use):
- Inspect through transparent dressing for:
- Redness, swelling, or drainage
- Dressing integrity (clean, dry, intact)
- Catheter position (stabilization platform secure)
- Palpate around site for:
- Tenderness, pain, or warmth
- Boggy or firm areas (suggests infiltration or phlebitis)
- Ask patient about comfort level
- Flushing protocol:
- Frequency: Every 8-12 hours if IV not in continuous use (saline lock)
- Volume: 10 mL normal saline (use 10 mL syringe minimum—smaller syringes create excessive pressure)
- Technique: Push-pause method (inject 1 mL, pause briefly, inject 1 mL, repeat)
- After medication: Flush with 10 mL saline after each medication administration
- Clamp sequence: Maintain positive pressure (finish pushing flush while simultaneously clamping line—prevents blood backflow)
- Dressing changes:
- Gauze dressing: Change every 2 days or when soiled/loose
- Transparent dressing: Change every 5-7 days or when compromised
- Change immediately if: Damp, loose, soiled, or site assessment needed
- Procedure:
- Perform hand hygiene, don gloves
- Carefully remove old dressing (hold catheter hub to prevent dislodgement)
- Assess site for complications
- Clean site per facility protocol if needed
- Apply new transparent dressing and relabel
- Blood sampling from catheter (if needed):
- Stop continuous infusion for 1 minute before sample
- Attach empty syringe, withdraw and discard 5 mL (waste)
- Attach sample syringe(s) and withdraw required volume
- Flush with 10 mL saline after sampling
- Resume IV infusion or clamp and cap ports
Troubleshooting:
No blood flash on insertion:
- May have missed vein—withdraw slightly and redirect at different angle
- Vein may have collapsed—release pressure, allow vein to refill
- May have punctured through vein (transfixion)—withdraw completely and attempt new site
- Blood control valve may be preventing visible flash—continue with insertion technique and verify patency after connection
Blood flash then loss of flash when threading catheter:
- Catheter tip may have contacted valve or vessel wall—withdraw 1-2mm and rotate slightly
- May be in bifurcation—withdraw and redirect
- Vein may be tortuous—withdraw slightly and attempt different angle
Inability to advance catheter:
- Do not force—risk of catheter shearing or vein damage
- May have entered vein at sharp angle—try lowering catheter more parallel to skin
- Vein may be sclerosed or tortuous—withdraw and select different vein
- May have subcutaneous placement—verify blood flash, if absent withdraw completely
Infiltration (swelling, coolness, pain during flush):
- Stop infusion immediately
- Discontinue IV and remove catheter
- Elevate extremity
- Apply warm or cold compress per facility protocol (warm for most medications; cold for vasoconstrictors)
- Document infiltration, volume infiltrated, appearance
- Monitor site for compartment syndrome if large volume infiltrated
- Restart IV in different location, preferably other arm
Phlebitis (redness, warmth, tenderness along vein, palpable cord):
- Document phlebitis using standardized scale (0-4)
- Discontinue IV if phlebitis >Grade 1
- Apply warm compress to affected area
- Consider need for alternative IV access
- Monitor for progression to thrombophlebitis
- Review medication irritation potential (acidic drugs, vesicants, high osmolality)
Occlusion (resistance when flushing, inability to infuse):
- Check for external causes first:
- Tubing kinked or clamped
- Patient lying on tubing
- Catheter against vessel wall (reposition arm or catheter)
- If no external cause:
- May be fibrin buildup or thrombus—do NOT force flush
- Attempt to aspirate blood clot with gentle suction
- If unable to clear, discontinue and restart
- Never forcefully flush occluded catheter (risk of embolism or vessel rupture)
Leaking at insertion site:
- Check all connections tight (catheter hub to extension, extension to IV tubing)
- Verify catheter hasn't partially dislodged
- Small amount of bleeding initially is normal—apply pressure briefly
- Persistent leaking suggests improper catheter position—may need to restart
Catheter dislodgement:
- If catheter partially out: discontinue, do not reinsert
- Apply pressure to stop bleeding
- Cover site with sterile dressing
- Restart IV in new location
- Document incident
Pain during infusion:
- Assess for infiltration (most common cause)
- Check infusion rate (too rapid can cause discomfort)
- Some medications cause venous irritation:
- Dilute irritating medications when possible
- Slow infusion rate
- Consider larger vein or central access for highly irritating drugs
- If persistent pain, consider discontinuing and restarting
Special Considerations:
Pediatric patients:
- 24G × 3/4" excellent choice for infants >3kg and children
- Use smallest appropriate gauge (prevents excessive vein trauma)
- Consider topical anesthetic (EMLA or Synera patch) 30-60 minutes before insertion
- Use distracti techniques during insertion (bubbles, toys, videos)
- May need assistant to help stabilize child's arm
- Parent presence often helps reduce anxiety
- Insert while child engaged in activity when possible (less anticipatory anxiety)
Geriatric patients:
- Elderly have fragile, thin-walled veins prone to rupture
- 24G ideal for elderly to reduce trauma
- Use minimal tourniquet pressure (fragile skin bruises easily)
- Avoid areas with thin, fragile skin
- Insert at very shallow angle (10-15 degrees)
- Advance very slowly to prevent vein rupture
- May have decreased sensation—monitor closely for infiltration
- Secure carefully (fragile skin tears easily from adhesives)
Oncology/chemotherapy patients:
- Veins often damaged from previous chemotherapy
- May have thrombosed veins that appear patent
- Avoid arm with lymphedema (post-mastectomy)
- Avoid limbs with planned radiation therapy
- Some chemotherapy drugs are vesicants—verify peripheral line appropriate before administering
- Consider PICC or port for extended chemotherapy (preserves peripheral veins)
Obese patients:
- May need longer catheter (1" to 1.25") to reach deeper veins
- Veins may not be visible—rely on palpation
- May need better lighting or ultrasound guidance
- Stabilization especially important (more tissue movement)
Dehydrated patients:
- Veins collapsed or difficult to palpate
- Apply warm compresses to insertion area for 5-10 minutes before insertion (dilates veins)
- Position arm below heart level (encourages venous filling)
- May need ultrasound guidance for difficult access
Patients on anticoagulation:
- May experience prolonged bleeding after insertion
- Apply pressure longer after insertion (3-5 minutes)
- Monitor site closely for hematoma formation
- Venipuncture should be atraumatic (minimize attempts)
Edematous extremities:
- Edema compresses veins and makes palpation difficult
- May need longer catheter to reach vein through edematous tissue
- Elevate extremity before insertion (reduces edema)
- Avoid placing IV in most edematous areas if possible
Dialysis patients:
- NEVER place IV in arm with AV fistula or graft (compromises dialysis access)
- Avoid repeated venipuncture in fistula arm (preserves veins)
- May have very limited venous access—use smallest appropriate gauge
- Consult with nephrology if access extremely limited
Emergency situations:
- 24G may be inadequate for rapid fluid resuscitation
- Consider 18G-20G in large vein for trauma/shock (if patient's veins can accommodate)
- Antecubital veins acceptable in emergencies (usually avoided due to location over joint)
- May attempt intraosseous (IO) access if IV access unobtainable and patient critical
Catheter Removal:
- Prepare supplies: Gauze, tape or adhesive bandage, gloves, sharps container
- Stop infusion: Turn off IV fluids, close clamps on extension set
- Hand hygiene and don gloves
- Remove dressing: Carefully peel back transparent dressing, holding stabilization platform in place
- Remove catheter: Grasp stabilization platform, apply gentle traction, and withdraw catheter smoothly in one motion parallel to vein
- Apply pressure: Immediately apply sterile gauze with firm pressure for 2-3 minutes (longer if patient on anticoagulants)
- Inspect catheter: Verify catheter tip is intact (compare to package length). If catheter appears shortened or torn, notify physician immediately (catheter embolism risk)
- Apply bandage: Once bleeding stopped, apply adhesive bandage or gauze with tape
- Dispose of catheter: Place entire catheter assembly in sharps container (contains needle even though retracted)
- Document removal: Date, time, reason for removal, site appearance, catheter integrity, patient tolerance
When to Remove/Replace IV Catheter:
- Routine replacement: No longer necessary unless clinically indicated (per CDC guidelines)
- Clinical indication to remove:
- Phlebitis (Grade 2 or higher: pain, erythema, and/or palpable cord)
- Infiltration or extravasation
- Occlusion that cannot be cleared
- Infection at site (redness, warmth, purulent drainage)
- Catheter no longer needed
- Patient discomfort or request
- Dressing cannot be maintained clean, dry, intact
- Accidental partial dislodgement
- Do NOT routinely replace: Current evidence shows routine replacement (every 72-96 hours) does not reduce infection risk and increases patient discomfort
Infection Prevention:
- Hand hygiene before and after catheter insertion, access, or assessment
- Aseptic technique during insertion
- Appropriate skin antisepsis (chlorhexidine preferred)
- Sterile or clean gloves per facility protocol
- Disinfect catheter hubs/ports with alcohol before each access (15-second scrub)
- Maintain clean, dry, intact dressing
- Remove catheter when no longer needed
- Never use catheter with signs of infection
When to Contact Provider:
- Signs of catheter-related bloodstream infection (fever, chills, elevated WBC)
- Signs of severe phlebitis or thrombophlebitis
- Signs of compartment syndrome after infiltration (severe pain, pallor, pulselessness, paresthesia, paralysis)
- Catheter fracture or embolism suspected
- Unable to establish IV access after multiple attempts in critical patient
- Extravasation of vesicant medication
- Patient develops allergic reaction to IV fluids or medications
Technical Specifications
Product Details:
- Brand: BD (Becton, Dickinson and Company)
- Product Line: Nexiva™ Closed IV Catheter System
- Catheter Gauge: 24G (0.7mm outer diameter)
- Catheter Length: 3/4 inch (0.75", 19mm)
- Catheter Material: Vialon™ biomaterial (FEP - fluorinated ethylene propylene)
- Catheter Type: Over-the-needle peripheral IV catheter
- Needle: Stainless steel, notched for improved blood visualization
- Safety Feature: Push-button needle retraction system
- Extension Set: Integrated, pre-attached (approximately 6-7 inches)
- Extension Set Material: Medical-grade PVC or polyurethane
- Connector Type: V-Link dual-port connector
- Number of Ports: Single access point with two V-Link side ports for multiple infusions
- Stabilization Platform: Integrated, transparent, adhesive-backed
- Blood Control Technology: Integrated valve prevents blood reflux
- Priming Volume: Minimal (approximately 0.5 mL including extension set)
- Flow Rate: Approximately 13-22 mL/min at gravity flow (varies with patient factors)
- Color Coding: Yellow hub (ISO standard for 24G)
- Sterility: Sterile, single-use only
- Sterilization Method: Ethylene oxide (EtO)
- Latex Content: Latex-free (no natural rubber latex)
- DEHP Content: DEHP-free
- Packaging: Individually wrapped in sterile peel-open package
- Shelf Life: Typically 3-5 years from manufacture date (check individual package)
- Intended Use: Peripheral intravenous access for infusion therapy
<li class="whitespace-normal break-word

 780 409-1509
 Get directions