Why Complete Hardware Replacement Kit
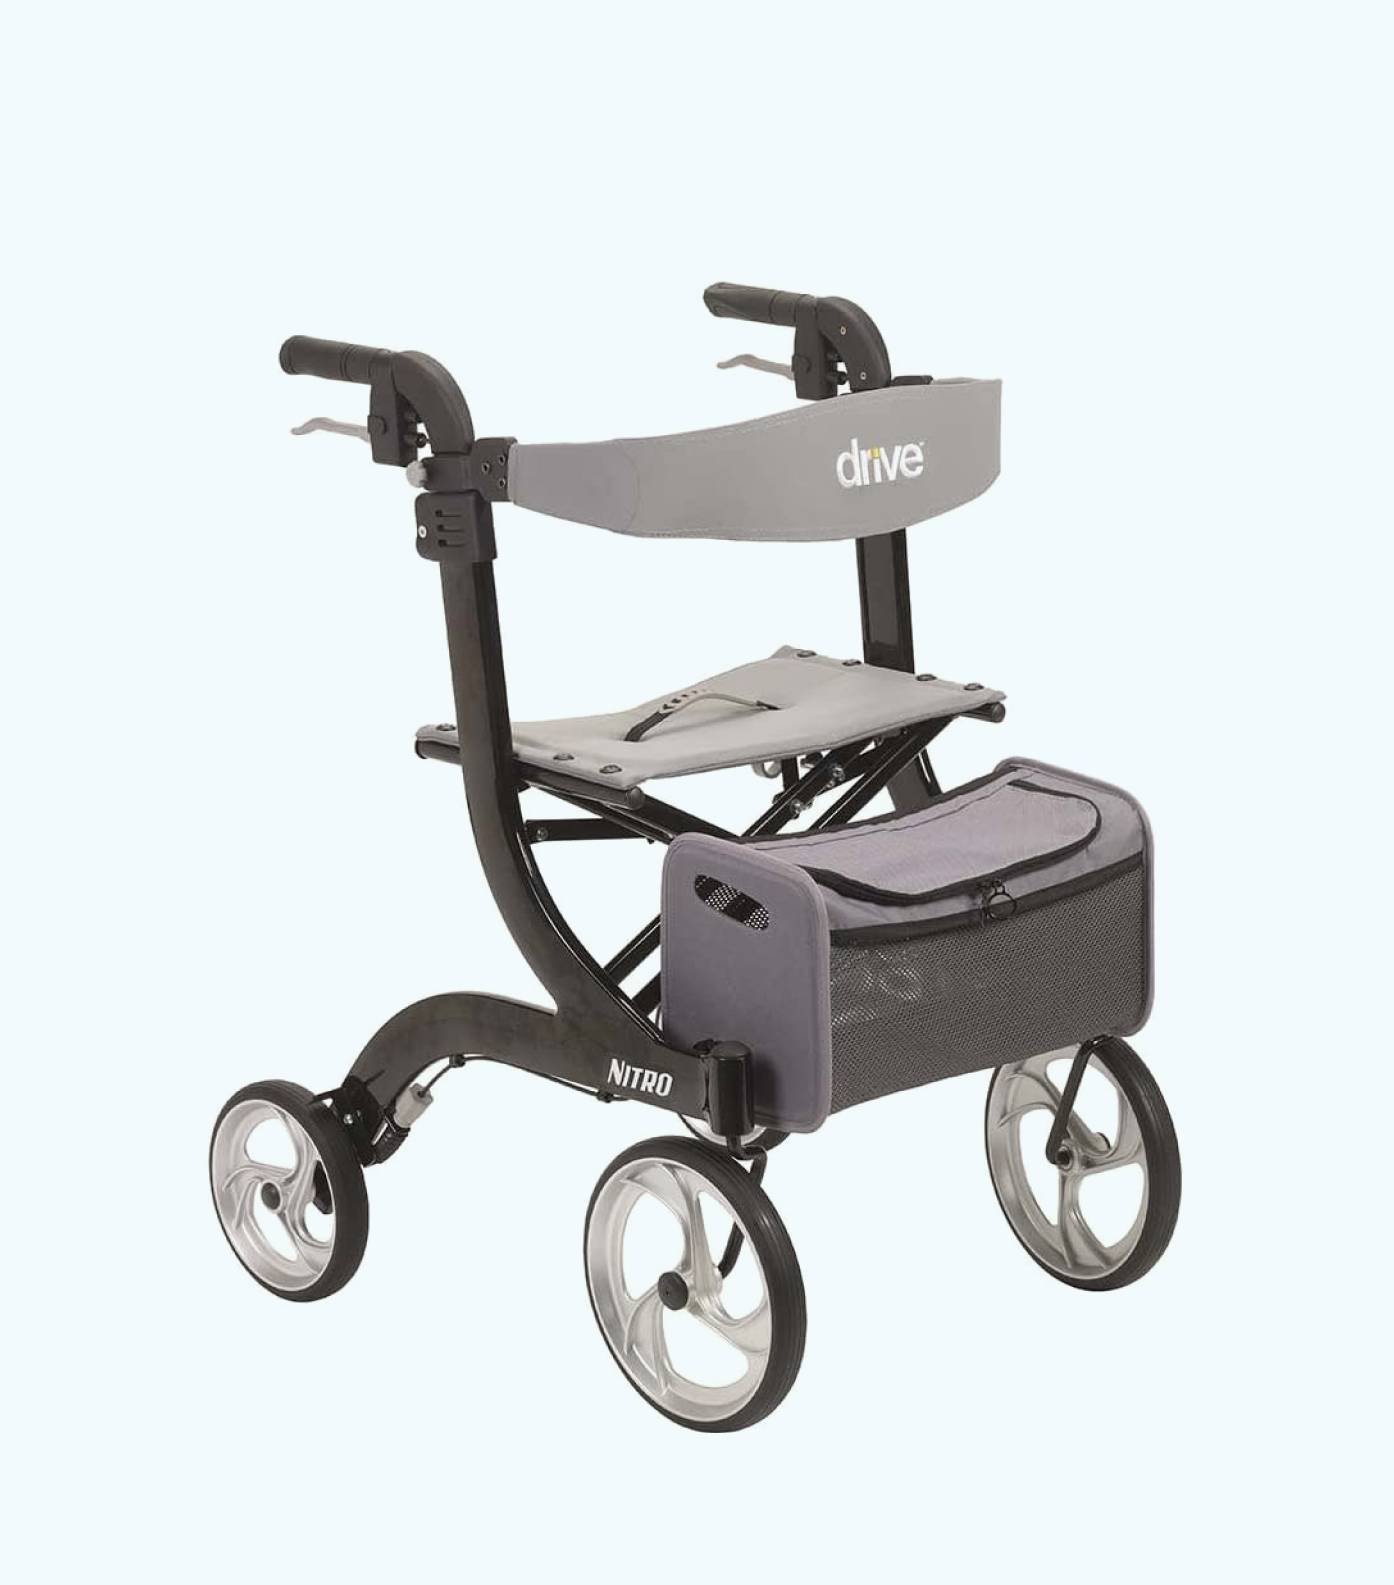
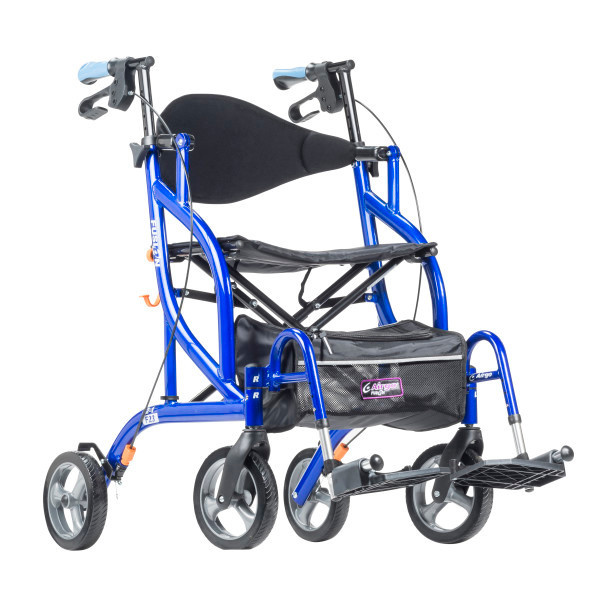
The Airgo side-fold rollator's sophisticated folding mechanism relies on precise bolt tension at multiple critical pivot points and cross-brace connections to maintain frame rigidity during use while enabling smooth folding action. As rollators age through daily use, these fasteners experience mechanical stress from repeated folding cycles, user weight transfer, and environmental exposure, leading to bolt wear, thread damage, and loosening that manifests as frame wobble, audible clicking or squeaking, uneven folding action, and reduced stability during ambulation. Replacing individual worn bolts addresses immediate problems but leaves other aging fasteners that will soon fail, requiring repeated disassembly and repair efforts. This complete hardware kit eliminates incremental failure by replacing all critical frame bolts simultaneously, restoring factory-specification frame alignment, tension, and rigidity. The OEM-style design ensures precise fit at Airgo's specific frame connection points, while hardened steel construction with corrosion-resistant finish provides superior durability versus generic hardware store fasteners that may not meet original equipment specifications for strength, thread pitch, or dimensional accuracy.
Key Features
- Complete Hardware Set: Includes all frame pivot bolts, cross-brace bolts, washers, and lock nuts for one rollator
- Model-Specific Compatibility: Engineered exclusively for Airgo Fusion and Airgo Excursion side-fold models
- OEM-Style Quality: Matches original equipment manufacturer specifications for fit, strength, and durability
- Hardened Steel Construction: Superior strength and wear resistance compared to standard hardware store bolts
- Corrosion-Resistant Finish: Protective coating prevents rust and corrosion from weather exposure and use
- Precision Thread Pitch: Exact thread specifications ensure proper engagement with rollator frame threads
- Proper Length Fasteners: Correct bolt lengths for each frame location prevent interference with folding mechanism
- Lock Nuts Included: Self-locking nuts prevent loosening from vibration and repeated folding cycles
- Standard & Nylon Washers: Appropriate washer types for each location based on load distribution requirements
- Left & Right Side Coverage: Complete hardware for both sides of rollator frame
- Factory Alignment Specifications: Enables restoration of original frame geometry and fold alignment
- Long-Term Durability: Quality materials extend service life beyond standard replacement hardware
Benefits
- Restores Frame Rigidity: Eliminates wobble, flex, and instability that develops as original hardware wears
- Eliminates Annoying Sounds: Removes clicking, squeaking, and rattling noises during use
- Improves Folding Function: Restores smooth, aligned folding and unfolding action
- Enhances User Safety: Prevents frame failure or collapse from severely worn hardware
- Extends Equipment Life: Proper hardware replacement adds years to rollator service life versus premature disposal
- Prevents Progressive Damage: Stops frame wear that occurs when loose bolts allow excessive movement
- Reduces Repeated Repairs: One-time complete replacement versus multiple individual bolt fixes
- Professional Appearance: Restores like-new condition and eliminates appearance of neglected equipment
- Cost-Effective Maintenance: $15-30 hardware kit versus $200-400 rollator replacement
- Supports Rental Fleet Management: Enables systematic refurbishment of rental equipment between users
- Facilitates DIY Repair: Complete kit eliminates guessing about correct fastener specifications
- Institutional Equipment Management: Bulk availability for facilities maintaining multiple rollators
Clinical Applications
✓ Preventive maintenance for aging rollators (3+ years service) before failure occurs
✓ Repair of rollators with audible clicking, squeaking, or rattling during use
✓ Restoration of wobbly or unstable frames affecting user confidence and safety
✓ Correction of misaligned folding mechanisms that don't collapse or open properly
✓ Refurbishment of rental equipment between users in home health agencies
✓ Fleet maintenance programs in nursing homes and assisted living facilities
✓ Medical equipment retail repair services offering rollator restoration
✓ Post-accident repair after rollator dropped, tipped, or experienced impact
✓ Replacement of missing bolts from incomplete prior repairs or factory defects
✓ Upgrade from corroded hardware on outdoor-stored or weather-exposed rollators
✓ Professional maintenance for long-term care facility equipment programs
✓ Home user self-maintenance extending personally-owned rollator service life
Usage & Application
Damage Assessment & Replacement Decision: Inspect rollator for hardware replacement indicators including frame wobbling side-to-side during use, audible clicking or squeaking sounds during walking or turning, uneven or difficult folding action requiring force to collapse or open, visible rust or corrosion on existing bolts, missing fasteners leaving open mounting holes, cracks in frame near connection points from stress caused by loose hardware. Perform frame stability test: with rollator unfolded and parking brakes engaged, apply moderate lateral pressure to handles—excessive frame flex or movement at pivot points indicates worn hardware requiring replacement. Test folding mechanism: rollator should fold and unfold smoothly with even resistance—binding, catching, or uneven movement suggests misalignment from worn bolts.
Tools & Supplies Required: Metric wrench set or adjustable wrenches (typically 10mm, 13mm, 15mm), metric hex key/Allen wrench set (if frame uses socket-head bolts), penetrating oil for loosening corroded existing hardware, wire brush for cleaning frame threads and mounting surfaces, clean rags for wiping debris, torque wrench for precise final tightening (optional but recommended), thread locker compound medium-strength (optional for permanent installation), parts tray or magnetic holder for organizing old hardware during removal, good lighting for inspecting small hardware and tight spaces.
Pre-Installation Preparation: Position rollator on flat, stable work surface at comfortable working height (workbench or table). Engage parking brakes to prevent rolling during disassembly. Remove any accessories (baskets, bags, trays) that might interfere with frame access. Take reference photos or video of rollator from multiple angles before disassembly—these document original hardware positions, orientation, and assembly sequence for reference during installation. Create a simple sketch or label system identifying each bolt location—side-fold rollators typically have 8-12 critical fasteners at various locations around frame. Lay out replacement hardware on clean surface, sorting by size and type to identify proper bolt for each location.
Systematic Disassembly Protocol: Begin hardware removal strategically to maintain frame stability during disassembly—never remove all bolts simultaneously as frame may collapse or misalign. Start with accessories or secondary connections (basket brackets, brake mounts if removable). Progress to cross-brace bolts while supporting frame to prevent uncontrolled folding. Remove pivot point bolts last, working symmetrically (one left, one right) to maintain even tension. For each fastener: Apply penetrating oil if corrosion present and allow 5-10 minutes to penetrate. Use correct-size wrench to avoid rounding bolt heads or nuts. If fastener seized, apply more oil and retry—avoid excessive force that may damage frame threads. For severely corroded fasteners that won't budge, carefully cut away with hacksaw or rotary tool, taking extreme care not to damage frame. As each bolt is removed, inspect frame hole condition—threads should be clean and intact. Use wire brush to clean debris, rust, or old thread locker from holes and surrounding frame surfaces.
Frame Condition Assessment During Disassembly: As frame is exposed, inspect for conditions requiring attention beyond hardware replacement: cracks in frame tubing or welds indicate structural damage requiring professional evaluation or rollator replacement; elongated bolt holes from excessive wear suggest frame damage that hardware alone cannot correct; corrosion beyond surface level indicates metal loss compromising frame integrity; bent or deformed frame components prevent proper alignment regardless of new hardware. If significant frame damage detected, discontinue assembly and consult professional repair service or consider rollator replacement—new hardware cannot restore structurally compromised frames.
Hardware Identification & Matching: Compare each original bolt removed to replacement hardware in kit, matching by length, diameter, thread pitch, and head style. Verify kit includes correct quantity of each fastener type—typical kit contains: 4-6 frame pivot bolts (longest, heaviest duty), 2-4 cross-brace bolts (medium length), 2-4 secondary connection bolts (varies by model), appropriate quantities of washers (flat, lock, nylon), appropriate lock nuts or self-locking nuts. If replacement hardware doesn't match original in critical specifications (particularly length or thread pitch), contact supplier before installation—incorrect fasteners may not engage properly or may interfere with folding mechanism.
Frame Alignment Verification: Before installing hardware, check frame alignment while partially disassembled. Side-fold frames should show symmetrical geometry left-to-right. If frame appears twisted or misaligned, attempt to true alignment by careful manipulation before final hardware installation. Severe misalignment may indicate previous accident damage requiring professional correction. Install replacement hardware starting with pivot points, then cross-braces, then secondary connections—this sequence maintains frame integrity during assembly.
Bolt Installation & Initial Tightening: For each bolt location: Select correct replacement bolt from kit based on original hardware removed. If washers required, sequence typically is bolt head → flat washer → frame → flat washer → lock nut or bolt head → frame → nylon washer → lock nut (order varies by specific location and load requirements—refer to reference photos if uncertain). Insert bolt through frame hole, ensuring threads engage nut without cross-threading. Hand-tighten to snug fit (no wrench pressure yet). Install all bolts to hand-tight before applying final torque—this allows minor frame position adjustments as assembly progresses.
Sequential Torquing Protocol: After all bolts hand-tight and frame geometry verified correct, apply final torque systematically. Typical torque specifications for rollator frame hardware: Pivot points 15-20 Nm (11-15 lb-ft)—must be tight enough to prevent loosening but allow smooth folding movement; Cross-braces 10-15 Nm (7-11 lb-ft)—secure frame but don't overtighten causing frame distortion; Secondary connections 8-12 Nm (6-9 lb-ft) unless otherwise specified. If torque wrench not available, use feel-based approach: "Hand-tight plus ½ turn" for pivot points, "Hand-tight plus ¼ turn" for cross-braces. Always tighten in alternating pattern (left side, right side) to maintain symmetric tension. After initial torquing, recheck first bolt—tightening others may have affected it. Verify lock nuts have engaged properly—nylon insert or deformed threads should provide resistance preventing easy loosening.
Folding Mechanism Testing: After all hardware installed and torqued, test folding function thoroughly before returning rollator to service. Release folding mechanism and collapse rollator—should fold smoothly with even resistance throughout range of motion. No binding, catching, or uneven movement should occur. If folding difficult or uneven, check for: overtightened pivot bolts restricting movement (loosen slightly), misaligned frame components (disassemble and correct alignment), foreign objects or debris interfering with mechanism. Unfold rollator—should open smoothly and lock into position firmly. Test multiple fold/unfold cycles to verify consistent operation.
Load Testing & Final Inspection: With rollator fully assembled and properly folded/unfolded, perform safety checks before user operates: Apply downward pressure on handles while brakes engaged—no frame flex or movement at pivot points should occur. Rock rollator side-to-side—frame should feel solid with no play or looseness. Push rollator forward/backward—no unusual sounds (clicking, squeaking, rattling). Inspect all bolt heads and nuts—all should be flush or properly recessed with no interference with frame movement or user contact. Check folding mechanism clearance—hardware should not contact or interfere with any moving parts. Mark frame with installation date using permanent marker to track service history.
Break-In Period & Retightening: New hardware may experience initial settling during first hours of use. After 1-2 hours of use, or 1-2 days of normal use, perform retightening check—inspect all fasteners and retorque any that have loosened. This initial settling is normal as metal-to-metal surfaces mate fully. After break-in period, hardware should remain tight under normal use conditions. Schedule routine inspection monthly for first 3 months, then quarterly thereafter.
Troubleshooting Installation Issues: Problem: Bolt threads don't engage properly. Solution: Verify correct bolt for location; check for cross-threading and restart carefully; inspect frame threads for damage requiring tap and die repair. Problem: Folding mechanism binds after installation. Solution: Loosen pivot bolts ¼ turn to reduce friction; verify frame alignment correct; check for overtightened cross-braces distorting frame. Problem: Frame still wobbles after hardware replacement. Solution: Verify all bolts properly torqued; inspect frame for damage hardware cannot correct; check for missed worn bushings or pivot sleeves requiring additional parts. Problem: Lock nuts won't stay tight. Solution: Verify lock nuts oriented correctly (nylon insert facing away from bolt head); replace with higher-quality lock nuts if supplied nuts inadequate; consider medium-strength thread locker. Problem: Can't achieve proper torque without frame distortion. Solution: May indicate frame damage from prior use; reassess frame condition; consider professional evaluation.
Long-Term Maintenance Schedule: Monthly inspection (first 3 months): Check all fastener tightness, retorque if any loosening detected. Quarterly inspection (after break-in): Inspect hardware for loosening, corrosion, or damage; retorque as needed. Annual major inspection: Disassemble critical connections, inspect hardware for wear, replace any corroded or damaged fasteners, clean and lubricate moving parts. Document all maintenance activities with dates and findings to track rollator condition over time.
Institutional Fleet Maintenance: For facilities maintaining multiple rollators, implement systematic hardware replacement program: Assign each rollator unique ID number for tracking. Create maintenance schedule based on service hours or calendar time (recommend hardware replacement every 2-3 years or 500 operating hours). Maintain adequate replacement kit inventory to avoid equipment downtime. Train maintenance staff on proper installation procedures. Keep detailed service records for each unit tracking hardware replacement dates, torque specifications used, any frame issues discovered. Consider preventive replacement before failure occurs—schedule hardware refresh during slow periods rather than emergency repairs during high-demand times.
Technical Specifications
- Compatibility: Airgo Fusion (side-fold) and Airgo Excursion (side-fold) rollators; verify model applicability as frame designs may vary by year
- Material: Hardened steel fasteners with corrosion-resistant protective coating (zinc plating or similar)
- Hardware Components (typical kit contents—verify actual contents with supplier):
- 4-6 frame pivot bolts (length and diameter vary by location)
- 2-4 cross-brace connection bolts
- 2-4 secondary connection bolts (accessory mounts, brake brackets)
- 10-20 flat washers (various sizes for load distribution)
- 4-8 lock washers or nylon washers
- 10-15 lock nuts (self-locking nylon insert or deformed thread type)
- Thread Specifications: Metric threading (M6, M8, M10 typical—specific sizes vary by location)
- Bolt Lengths: Multiple lengths from 15mm to 60mm depending on frame connection point
- Torque Specifications (typical—verify with manufacturer if available):
- Pivot points: 15-20 Nm (11-15 lb-ft)
- Cross-braces: 10-15 Nm (7-11 lb-ft)
- Secondary connections: 8-12 Nm (6-9 lb-ft)
- Color/Finish: Silver metallic (zinc plating) or black (oxide coating)—varies by production batch
- Weight: Approximately 0.25-0.5 lb complete kit
- Package Quantity: One complete set for one rollator (all locations, both sides)
- Installation Time: 1-2 hours for experienced technician; 2-3 hours for DIY first-time installer
- Tools Required: Metric wrenches (10mm, 13mm, 15mm typical), hex keys if applicable, penetrating oil, wire brush
- Expected Service Life: 2-3 years typical use (500+ operating hours) before replacement consideration
- Intended Use: Maintenance replacement hardware for Airgo side-fold rollators in home and institutional settings
- Warranty: Manufacturer limited warranty against defects (verify terms with supplier)
- Storage: Keep sealed in dry location; hardware susceptible to corrosion if exposed to moisture
- Model/SKU: Verify specific SKU with Airgo or authorized distributor as part numbers may vary

 780 409-1509
 Get directions