Why Replacement Joints Are Critical for Bed Rail Safety
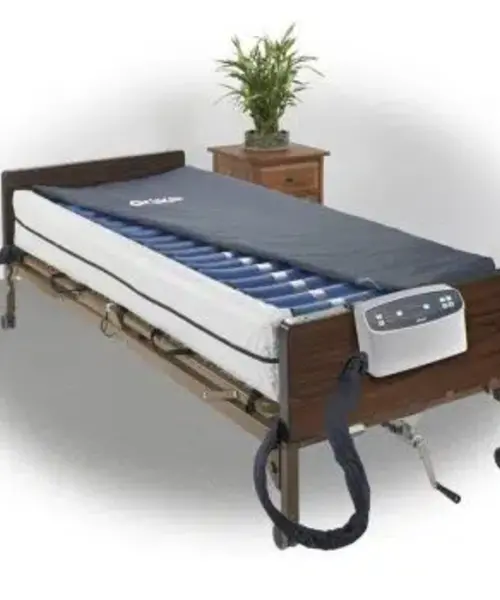
Bed rail joints represent the most critical mechanical component in hospital-grade and home care bed rail systems, serving as the pivot point that enables rails to fold up for patient protection and fold down for caregiver access. Over time, repeated folding cycles, patient contact forces, and environmental factors cause joint wear that manifests as looseness, rattling, misalignment, or binding during operation. This degradation compromises not only the functional convenience of the rail system but, more critically, the safety integrity that prevents patient falls during transfers, repositioning, or nighttime disorientation. A worn joint may fail to lock securely in the upright position, creating a dangerous gap where a patient could become entrapped or fall through, or it may bind during lowering, causing caregivers to use excessive force that could lead to sudden release and injury. The Orthex replacement joint employs reinforced metal housing construction with precision-machined pivot mechanisms that restore original equipment manufacturer (OEM) specifications, ensuring smooth articulation through the full range of motion while maintaining secure locking in both raised and lowered positions. The corrosion-resistant finish protects against degradation from cleaning agents, bodily fluids, and moisture exposure common in healthcare environments, while pre-drilled mounting holes align with existing Orthex bed rail attachment points for straightforward replacement using basic hand tools. Replacing worn joints proactively, rather than waiting for complete failure, represents sound risk management for both patient safety and equipment longevity.
Key Features
- OEM replacement joint compatible with select Orthex bed rail models
- Reinforced metal housing construction for maximum durability
- Precision-machined pivot mechanism for smooth articulation
- Corrosion-resistant finish withstands cleaning agents and moisture
- Pre-drilled mounting holes align with existing rail attachment points
- Includes mounting hardware (fasteners, washers) on select kit versions
- Universal orientation fits left or right rail positions (model-dependent)
- Engineered to restore original locking and release functionality
- Meets or exceeds original manufacturer specifications
- Single replacement joint per package (order quantity as needed)
Benefits
- Restores secure locking function to worn or damaged bed rails
- Eliminates dangerous wobble, rattling, and misalignment
- Extends useful life of existing bed rail investment
- More cost-effective than complete rail replacement
- Improves caregiver confidence during rail operation
- Enhances patient safety by ensuring proper gap protection
- Straightforward installation with basic hand tools
- Reduces downtime compared to ordering complete rail assemblies
- Maintains compliance with safety standards when properly installed
- Compatible with existing Orthex bed rail infrastructure
Clinical Applications
✓ Repair of worn or damaged Orthex hospital bed rails ✓ Maintenance of home care adjustable bed rail systems ✓ Long-term care facility bed rail refurbishment programs ✓ Assisted living and nursing home equipment maintenance ✓ Hospice and palliative care bed safety equipment ✓ Rehabilitation facility bed rail system upkeep ✓ Private duty home care patient safety equipment ✓ Pediatric bed rail systems requiring joint replacement ✓ Bariatric bed rail assemblies experiencing joint stress ✓ Preventive maintenance programs for healthcare facilities
Usage & Application
Pre-Installation Assessment:
- Confirm bed rail model number and compatibility with replacement joint
- Inspect existing rail for additional damage requiring replacement
- Verify replacement joint includes correct mounting hardware
- Gather required tools (typically: socket wrench, screwdriver, Allen keys)
- Ensure bed is unoccupied and locked in stable position
- Document current rail configuration with photos if complex assembly
Safety Preparation:
- Lock bed in lowest position for stability during work
- Engage wheel locks to prevent bed movement
- Disconnect power if working on electric adjustable bed
- Clear workspace of obstacles and trip hazards
- Wear safety glasses if working overhead or under rail
- Have assistant available for heavy or awkward rail sections
Joint Removal Process:
- Lower bed rail completely to relaxed position
- Support rail weight (rails can be heavy—use assistant if needed)
- Locate and identify all fasteners securing worn joint
- Take photo of fastener arrangement before removal
- Remove fasteners in systematic pattern (typically opposite diagonal sequence)
- Support rail as last fastener is removed to prevent dropping
- Carefully withdraw worn joint from mounting position
- Inspect mounting surfaces for damage, corrosion, or deformation
- Clean mounting surfaces with appropriate cleaner (remove rust, debris)
Worn Joint Inspection for Reference:
- Note specific failure mode (cracked housing, worn pivot, loose fasteners)
- Check if wear pattern indicates alignment issues
- Verify new joint design addresses observed failure mechanism
- Document failure for maintenance records
- Compare worn joint dimensions to new joint (verify correct replacement)
New Joint Installation:
- Position new joint in mounting location (verify correct orientation)
- Align pre-drilled holes with existing mounting points on rail
- Insert all fasteners finger-tight before fully tightening any
- Verify joint moves freely through full range of motion
- Check for proper alignment (no binding, smooth operation)
- Tighten fasteners in systematic pattern per manufacturer torque specifications
- Use torque wrench if specifications provided (typically 15-25 ft-lbs for bed rail joints)
- Double-check all fasteners after initial tightening
- Verify no gaps between joint housing and mounting surfaces
Post-Installation Verification:
- Operate rail through full up/down cycle multiple times
- Verify locking mechanism engages properly in raised position
- Check for secure retention in lowered position
- Ensure no rattling, binding, or unusual resistance
- Verify equal operation on both sides if dual-rail system
- Test release mechanism functions smoothly
- Inspect for any interference with bed adjustment mechanisms
- Confirm rail clears mattress, headboard, and footboard throughout motion
Function Testing Protocol:
- Raise rail to full upright/locked position
- Apply moderate downward pressure to verify lock holds (do NOT use excessive force)
- Activate release mechanism and verify rail lowers smoothly
- Repeat up/down cycle 5-10 times to verify consistent operation
- Check that rail does not drift or sag when locked
- Verify no pinch points created at joint during operation
- Ensure caregiver can operate rail with one hand if design intent
- Test from both sides of bed if applicable
Torque Specifications and Hardware:
- Follow manufacturer torque values if provided (typically 15-25 ft-lbs)
- If torque not specified, tighten until snug plus 1/4 turn
- Do not overtighten (can strip threads or crack housing)
- Use thread-locking compound on fasteners if recommended
- Replace any damaged or corroded fasteners
- Ensure washers are properly positioned (prevents housing damage)
Multiple Joint Replacement:
- If replacing multiple joints, complete one rail entirely before starting next
- Maintain systematic approach (left then right, or head then foot)
- Verify each rail functions independently before final testing
- Balance tightening between multiple joints on same rail
Compatibility Verification:
- Confirm part number matches bed rail model/series
- Check that mounting hole spacing aligns (verify before removing old joint)
- Some Orthex models may have different joint designs for head vs. foot
- Universal joints may require orientation selection during installation
- Contact manufacturer if compatibility uncertain
Common Installation Errors to Avoid:
- Installing joint in reversed or incorrect orientation
- Failing to fully seat joint before tightening fasteners
- Overtightening fasteners (causes housing stress and future failure)
- Skipping verification that rail moves freely before final tightening
- Not using provided washers or spacers
- Mixing hardware from different kits (use only matched components)
- Attempting to use worn or damaged fasteners from old joint
Maintenance After Installation:
- Operate rail daily to prevent pivot stiffness
- Inspect joint monthly for loose fasteners
- Re-tighten fasteners if any loosening detected
- Clean joint area during routine bed cleaning
- Lubricate pivot point quarterly with appropriate lubricant (check manufacturer guidance)
- Document installation date for maintenance records
- Schedule re-inspection after 30 days of use
Expected Joint Lifespan:
- Typical service life: 3-5 years with normal use
- Hospital settings: May require more frequent replacement (2-3 years)
- Home care: May last 5-7 years with lighter use
- Replace proactively at first sign of wear rather than waiting for failure
Troubleshooting Post-Installation Issues:
Rail Binds During Operation:
- Verify joint is fully seated in mounting position
- Check for interference from overtightened fasteners
- Ensure no debris trapped in pivot mechanism
- Verify correct orientation of joint
Rail Doesn't Lock Securely:
- Check that locking mechanism components are properly aligned
- Verify all fasteners are adequately tightened
- Inspect for damage to locking surfaces
- May indicate additional rail components need replacement
Rattling or Play Despite New Joint:
- Verify all fasteners are properly torqued
- Check for worn mounting surfaces on rail itself
- Inspect for damage to rail frame requiring repair
- May indicate rail frame deformation beyond joint replacement
Uneven Operation Between Left/Right Rails:
- Compare installation of both joints
- Verify both joints are same part number/design
- Check bed frame for levelness and stability
- Inspect for damage to one rail requiring additional repair
When to Seek Professional Service:
- Unable to achieve smooth operation after installation
- Structural damage discovered to rail frame during inspection
- Uncertainty about proper torque specifications
- Multiple joints failing prematurely (may indicate bed frame issues)
- Bed rail system includes electronic or pneumatic components
- Facility policy requires certified biomedical technician for medical equipment
Safety Considerations:
- Never operate bed with patient present until installation verified
- Do not use rail if any looseness or binding detected
- Bed rails are patient safety devices—proper function is critical
- Improper installation can create entrapment hazards
- Follow all manufacturer guidelines and facility protocols
- Document repair in facility maintenance records
- Inform nursing staff of repair completion and verification status
Regulatory and Compliance Notes:
- Replacement parts should maintain original equipment safety standards
- FDA regulates bed rails as Class I medical devices
- Facility should maintain records of all bed rail maintenance
- Some jurisdictions require inspection after modification
- Use only OEM or approved equivalent replacement parts
- Follow facility biomedical engineering protocols where applicable
Technical Specifications
- Brand: Orthex
- Part Type: Bed Rail Replacement Joint Assembly
- Function: Pivot joint for bed rail articulation (fold up/down mechanism)
- Construction Material: Metal housing (typically steel or aluminum alloy)
- Finish: Corrosion-resistant coating (powder coat, zinc plating, or similar)
- Pivot Mechanism: Precision-machined bearing or bushing system
- Mounting Style: Pre-drilled holes for bolt-through attachment
- Mounting Hardware: Includes fasteners, washers, and spacers (kit-dependent)
- Fastener Type: Typically hex-head bolts, socket-head cap screws, or carriage bolts
- Typical Torque Range: 15-25 ft-lbs (consult specific model documentation)
- Orientation: Universal left/right (or model-specific—verify before ordering)
- Compatibility: Select Orthex bed rail models (verify model/series compatibility)
- Weight Capacity: Matches original rail specification (typically 250-500 lbs)
- Operating Temperature Range: Standard indoor healthcare environment (-10°C to 50°C)
- Cleaning Compatibility: Resistant to standard hospital-grade disinfectants
- Expected Service Life: 3-5 years typical use (varies by application intensity)
- Installation Time: 30-60 minutes per joint for experienced technician
- Required Tools: Socket wrench set, screwdrivers, Allen keys (standard hand tools)
- Recommended: Torque wrench for proper fastener tension
- Packaging: Single replacement joint per package
- Quantity: Sold individually (order multiple for complete rail system)
- Part Number: Model-specific (verify compatibility before ordering)
- Replacement Frequency: As needed based on wear inspection
- Warranty: Consult manufacturer documentation (typically 1 year)

 780 409-1509
 Get directions