Why Floor-Mounted Design Matters
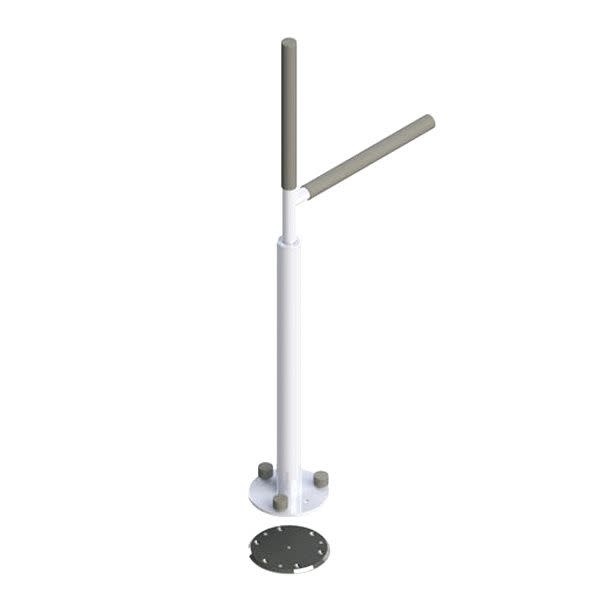
Many residential and institutional environments present structural barriers preventing traditional transfer equipment installation: bathrooms with suspended ceilings lack solid ceiling structure for floor-to-ceiling tension poles, bedrooms with inadequate wall studs cannot safely anchor wall-mounted grab bars, rental properties prohibit permanent ceiling or extensive wall modifications, and rooms with unusual ceiling heights (under 7 feet or over 10 feet) exceed standard pole specifications. The HealthCraft Advantage Rail solves these limitations through robust floor-mounting that requires only solid floor structure—the single most universally available architectural element. The vertical mast provides stable pulling support during sit-to-stand transitions while the integrated Pivot & Lock SuperBar rotates 360 degrees around the mast, locking in eight distinct 45-degree positions to maintain optimal hand placement throughout multi-step transfer sequences. This floor-only installation enables transfer support in previously impossible locations: beside toilets where wall studs don't align with optimal grip placement, next to beds where ceiling joists run perpendicular to desired pole position, in apartments where landlords prohibit ceiling modifications, and in bathrooms where drop ceilings conceal inadequate structure.
Key Features
- 300 lb Weight Capacity: Rated for everyday residential use supporting most adult users during transfers
- Floor-Mounted Installation: Requires only solid floor structure—no ceiling or wall mounting needed
- Pivot & Lock SuperBar Technology: Support arm rotates 360° and locks in 8 fixed positions (45-degree increments)
- Height-Adjustable Design: Vertical rail adjusts within 30-38 inch range from floor optimizing grip height
- 1.5-Inch Diameter Rail: Large-diameter tubing provides comfortable, secure full-hand grip
- Reinforced Alloy Steel Construction: Durable material withstands repeated daily loading cycles
- Anti-Microbial Powder-Coat Finish: White finish resists bacterial growth and simplifies cleaning
- Latex-Free Grip Surface: Non-slip PVC closed-cell foam accommodates latex sensitivities
- Concealed Floor Fasteners: Cover plate hides mounting hardware for clean, professional appearance
- Compact Footprint: Low-profile base plate minimizes floor space obstruction
- Support Arm Length: 17-18 inch horizontal bar provides extended reach during transfers
- Multiple Installation Surfaces: Mounts to wood subfloor, concrete slab, or engineered flooring with appropriate fasteners
- Professional White Finish: Standard medical equipment color integrates with home décor
- Easy-Clean Materials: Smooth surfaces wipe clean with standard disinfectants
Benefits
- Enables Impossible Installations: Transfer support where ceiling poles and wall bars cannot be installed
- Prevents Fall Risk: Stable support during standing, pivoting, and bed/chair/toilet transfers
- Adapts to Transfer Sequence: Eight locking positions match natural body movement throughout transfers
- Eliminates Ceiling Requirements: No ceiling structure needed—perfect for drop ceilings, high ceilings, rental units
- Overcomes Wall Limitations: Independent of wall stud location and wall strength concerns
- Rental-Property Friendly: Floor-only installation more acceptable to landlords than ceiling/wall modifications
- Maintains Independence: Confident self-transfer capability preserves dignity and autonomy
- Reduces Caregiver Burden: Patient uses rail for primary support, caregiver provides guidance only
- Compact Solution: Smaller footprint than floor-to-ceiling poles in tight bathroom spaces
- Versatile Placement: Install beside bed, toilet, chair, or anywhere solid floor exists
- Quick Repositioning: Pivot mechanism adapts support angle without moving entire rail
- Long-Term Durability: Reinforced construction withstands years of repeated use
- Professional Appearance: Concealed fasteners and clean finish maintain aesthetic standards
Clinical Applications
✓ Seniors with balance impairment requiring bedside or toilet transfer assistance
✓ Post-operative hip or knee replacement patients during early mobilization
✓ Stroke survivors with hemiparesis needing unilateral support during transfers
✓ Parkinson's disease patients with gait freezing and transfer difficulties
✓ Multiple sclerosis patients with progressive weakness affecting balance
✓ Arthritis patients with joint pain limiting standing ability
✓ Cardiac patients with activity restrictions requiring supported transfers
✓ Rehabilitation patients transitioning from hospital to home requiring continued support
✓ Rental apartment residents unable to install ceiling or wall-mounted equipment
✓ Bathrooms with drop ceilings preventing floor-to-ceiling pole installation
✓ Bedrooms with inadequate wall stud placement for grab bar mounting
✓ Nursing homes requiring additional transfer support in specific resident rooms
✓ Assisted living facilities accommodating varied resident mobility needs
✓ Home health patients with structural limitations preventing standard equipment
✓ Elderly aging-in-place requiring progressive mobility support as capabilities decline
Usage & Application
Pre-Installation Assessment
Verify patient weight does not exceed 300 lb capacity. Identify optimal floor location beside bed, toilet, favorite chair, or wheelchair transfer point—user should reach rail comfortably from seated position without excessive leaning. Assess floor structure: solid wood subfloor over joists, concrete slab, or engineered flooring acceptable; inadequate floor structures include particle board, thin plywood over open space, or floating floors without subfloor connection. Measure vertical clearance ensuring height-adjustable range (30-38 inches) provides appropriate grip height for seated and standing positions. Verify rail placement doesn't obstruct pathways, door swings, or furniture movement.
Professional Installation Recommendation
While homeowners with construction experience may attempt installation, professional installation by qualified contractor recommended for safety-critical applications. Installer must verify floor structure adequacy, use appropriate fasteners for specific floor type, and torque all fasteners to manufacturer specifications. Improper installation creates serious fall risk and voids warranty. For concrete floors, professional installation essential due to specialized drilling and anchor requirements.
Wood Subfloor Installation Procedure
Locate floor joists using stud finder or by tapping to identify solid structure—base plate must anchor to joists, never only to subfloor surface. Position base plate at desired location with at least two mounting holes aligned over joist centerlines. Mark mounting hole locations through base plate onto floor. Drill pilot holes to appropriate depth and diameter per fastener specifications. If joists don't align perfectly with all mounting holes, use blocking between joists to create solid anchoring points (requires subfloor access from below). Secure base plate using heavy-duty lag screws or through-bolts with washers, tightening progressively in star pattern to achieve even pressure distribution. Verify plate sits flat with no gaps or rocking.
Concrete Slab Installation Procedure
Position base plate at desired location. Mark mounting hole locations. Using hammer drill with masonry bit, drill holes to specified depth and diameter for concrete anchors (typically 3/8-inch diameter, 3-4 inches deep). Clean holes thoroughly removing all concrete dust using vacuum or compressed air—debris prevents proper anchor seating. Insert concrete expansion anchors or sleeve anchors per manufacturer instructions. Position base plate and insert fasteners through plate into anchors. Tighten progressively in star pattern until anchors properly expand and plate sits firmly against concrete without gaps. Apply specified torque—under-tightening allows movement, over-tightening may crack concrete.
Engineered Flooring Installation Considerations
Engineered flooring (laminate, luxury vinyl plank, etc.) typically floats over underlayment without direct subfloor attachment. Rail cannot anchor to floating floor alone—must penetrate through to solid subfloor or concrete beneath. Installation requires removing flooring section at base plate location or drilling through flooring (latter creates permanent holes). If flooring removal unacceptable, consider alternative transfer equipment (tension-mount ceiling pole if ceiling adequate). Consult flooring manufacturer regarding warranty implications of drilling through engineered flooring.
Vertical Rail Height Adjustment
With base securely installed, adjust vertical rail height within 30-38 inch range from floor. Optimal height: when user sits on bed/toilet/chair edge, grip should align approximately with user's shoulder or upper chest height—allows comfortable pulling motion during standing. Taller users require upper range (36-38 inches), shorter users lower range (30-32 inches), average users mid-range (33-35 inches). Lock height adjustment mechanism per manufacturer instructions. Test by having user sit and reach for rail—should grasp comfortably without excessive bending or reaching.
SuperBar Pivot & Lock Operation
To rotate SuperBar: Grasp bar firmly with one hand, lift slightly (approximately 1/4-inch) to disengage locking mechanism. While maintaining lift pressure, rotate bar smoothly around vertical mast to desired position. Release upward pressure—bar should drop into nearest 45-degree locking position with audible click. Verify lock engagement by pulling bar firmly—properly locked bar will not rotate. Eight locking positions (every 45 degrees) accommodate every transfer angle: front position for initial standing, side positions for lateral pivoting, rear position for sitting guidance. Practice rotation during non-transfer situations to develop smooth, automatic operation.
Bed-to-Standing Transfer Protocol
Patient sits on bed edge, feet flat on floor positioned slightly behind knees, hips toward front of mattress. Rotate SuperBar to position directly in front of patient within comfortable reach (typically front or slight front-side position). Patient grasps bar with both hands (or stronger hand if unilateral weakness), establishing secure grip. On count of three, patient pulls firmly on bar while simultaneously pushing with legs and hips to stand. Bar provides stable anchor enabling upper body to assist lower body in lifting body weight. Once standing, patient may rotate SuperBar to side position for balance support during ambulation or transfer to walker/wheelchair.
Standing-to-Sitting Transfer Protocol
Patient approaches bed/chair/toilet using walker, cane, or caregiver assistance. Before turning back to seated surface, patient grasps SuperBar with one or both hands for balance. Patient pivots slowly (feet shuffling in small steps) until back faces seated surface, maintaining grip on bar throughout pivot. Patient backs up until legs contact seat edge. While maintaining bar grip for stability, patient lowers gradually using leg control rather than dropping. Bar provides balance and fall prevention during controlled descent. Once seated, patient releases bar.
Toilet Transfer Applications
Optimal rail placement: beside toilet allowing reach from seated position, typically 12-18 inches from toilet centerline to rail center—close enough to reach but not obstructing transfer motion. SuperBar particularly valuable for toilet transfers: front position assists standing from toilet, side position provides balance during turning, rear position stabilizes during lowering to toilet. For maximum effectiveness, pair Advantage Rail with toilet safety frame creating multi-direction support system. Rail handles primary vertical support, frame provides side stability and armrest function.
Bedroom Installation Strategies
Optimal bed placement: rail positioned at bedside where patient sits before standing, typically at head-of-bed or foot-of-bed corner depending on patient's habitual bed exit pattern. Distance: 12-18 inches from bed edge to rail center allows easy reach without interference during sleeping. Height setting: user seated on bed edge should grasp rail at comfortable pulling height (generally 30-35 inches for standard-height beds). SuperBar provides progressive support: locked in front position during initial sitting, rotated to side during standing, repositioned as needed for bed return.
Bathroom Space Optimization
Advantage Rail's compact footprint advantageous in tight bathrooms where floor-to-ceiling poles consume excessive space. Base plate typically 8-12 inches diameter occupies minimal floor area. Vertical design keeps support within small footprint rather than extending into room like wall-mounted grab bars. Particularly effective beside toilets in narrow bathroom layouts where pole or extensive grab bar systems impossible. Consider coordinating with corner installations to maximize available space.
Multi-Position Use Throughout Day
Patient requires transfer assistance at multiple daily activities: rising from bed morning/evening, toilet visits throughout day, transitioning to/from favorite chair for meals and activities. Single properly-placed rail can serve as primary transfer point with SuperBar rotation adapting to each specific transfer type. Bedroom rail assists bed transfers; bathroom rail handles toilet transfers; living room rail supports chair transfers. Most users need 1-2 rails maximum (bedroom + bathroom) rather than poles in every room.
Caregiver-Assisted Transfer Techniques
For patients requiring caregiver assistance, rail reduces physical burden on caregiver. Patient uses rail as primary support executing most lifting force independently. Caregiver positions behind or beside patient, hands on patient's back or transfer belt (not arms—restricts range of motion), providing guidance, stability, and minimal lifting assist. Caregiver verbally cues: "Grasp the rail," "Pull yourself up," "I'm helping guide your balance." Rail transforms caregiver role from lifting patient's full weight to providing supplemental support while patient does primary work.
Patient Training Protocol
Before independent use, patient must demonstrate competency: correct SuperBar locking (can hear/feel click, tests hold before trusting full weight), proper grip technique (full hand grip, not fingertips; thumbs wrapped around bar), smooth pulling motion (no jerking that causes balance loss), controlled lowering (gradual descent, not dropping), and emergency response (what to do if bar unlocks or patient loses balance mid-transfer). Supervise initial 5-10 transfers before independent use. Build confidence progressively—early transfers with maximum caregiver standby, transitioning to independent as patient demonstrates consistent safe technique.
Maintenance and Inspection Schedule
Weekly inspection: Test SuperBar rotation and locking—should move smoothly and lock audibly at all 8 positions. Check vertical rail for looseness—grasp firmly and attempt to rock back and forth; properly installed rail shows no movement. Examine base plate—should sit flat against floor with no gaps or lifted edges. Monthly detailed inspection: Remove cover plate and verify all floor fasteners remain tight (retorque if needed). Check grip surface for wear, cracks, or degradation. Wipe down with disinfectant. Quarterly professional inspection recommended for institutional settings or high-use home applications to ensure continued structural integrity.
Cleaning and Hygiene Protocols
Daily cleaning during active use: Wipe vertical rail and SuperBar with damp cloth and mild soap to remove oils, skin cells, and debris. Weekly deep cleaning: Use facility-approved disinfectant or household disinfectant compatible with powder-coat finish—spray onto cloth and wipe thoroughly (avoid spraying directly onto floor plate which may introduce moisture to fasteners). Dry completely after cleaning. For institutional settings with infection control requirements, follow established equipment cleaning protocols using approved disinfectants. Pay attention to grip surface where hands contact—this area requires most frequent cleaning.
Seasonal Maintenance Considerations
In humid climates, inspect floor fasteners more frequently for corrosion—moisture penetration can degrade anchors over time. In homes with basement installations, monitor for moisture intrusion affecting floor structure beneath base plate. After initial installation, recheck fastener tightness after first week of use—settling may occur as materials compress under load. If floor surface refinished or replaced, reinstallation may be required to maintain proper mounting.
Troubleshooting Common Issues
SuperBar won't lock in position: Likely debris in locking groove around vertical mast. Clean thoroughly. Ensure bar lifted sufficient height to clear locking mechanism before rotating. If problem persists, contact manufacturer—never use with faulty locking system.
Rail feels loose during use: Floor fasteners may have loosened. Remove cover plate and retorque all fasteners to specification. If loosening recurs, floor structure may be inadequate—consult professional installer to assess structural adequacy and potentially reinforce floor beneath base plate.
Patient cannot reach rail from seated position: Rail positioned too far from bed/toilet/chair. Reinstallation closer may be required. Alternatively, height adjustment may help—raising rail increases reach slightly. For toilet applications, consider adding toilet safety frame providing armrest support in conjunction with floor rail.
Base plate rocks or doesn't sit flush: Floor surface uneven. May require shimming during installation to achieve flat seating. Alternatively, floor may have deflection under load indicating structural inadequacy—professional assessment needed.
Grip surface deteriorating: Normal wear with extended use. Replacement grips available from manufacturer. Replace when texture degrades affecting secure hold.
Technical Specifications
- Product Name: HealthCraft Advantage Rail with SuperBar
- Brand: HealthCraft Products
- Model Variants: AR-T (standard) / AR-PT (portable) with SuperBar attachment
- Weight Capacity: 300 lb (136 kg) maximum safe working load
- Primary Material: Reinforced alloy steel construction
- Finish: Anti-microbial white powder-coat, latex-free surface
- Vertical Rail Diameter: 1.5 inches (38 mm) for comfortable secure grip
- Support Arm (SuperBar) Length: Approximately 17-18 inches (43-46 cm) horizontal reach
- Height Adjustment Range: 30-38 inches (76-97 cm) from floor to grip surface
- Grip Material: Latex-free, non-slip PVC closed-cell foam
- Pivot & Lock System: SuperBar rotates 360° and locks in 8 positions (45-degree increments)
- Mounting Type: Floor-mounted with concealed fastener system and cover plate
- Base Plate Configuration: Concealed screws with decorative cover for clean appearance
- Installation Surfaces: Solid wood subfloor over joists, concrete slab, engineered flooring (with subfloor penetration)
- Fastener Requirements: Heavy-duty lag screws (wood) or concrete expansion anchors (concrete)—verify manufacturer specifications
- Floor Footprint: Compact base plate (approximately 8-12 inch diameter typical)
- Installation: Professional installation recommended; DIY possible for experienced homeowners
- Color: Professional white (standard medical equipment finish)
- Typical Applications: Bedside transfers, toilet transfers, chair transfers
- Intended Users: Seniors, rehabilitation patients, mobility-impaired individuals up to 300 lb
- Service Life: Heavy-duty construction designed for years of daily residential use
- Warranty: Per HealthCraft manufacturer warranty (verify with supplier)
- Compliance: Engineered to applicable accessibility and transfer equipment standards
- Cleaning: Wipe-clean with mild soap or approved disinfectants
- Accessories Available: Replacement grips, extension components (verify availability)
 780 409-1509
 Get directions