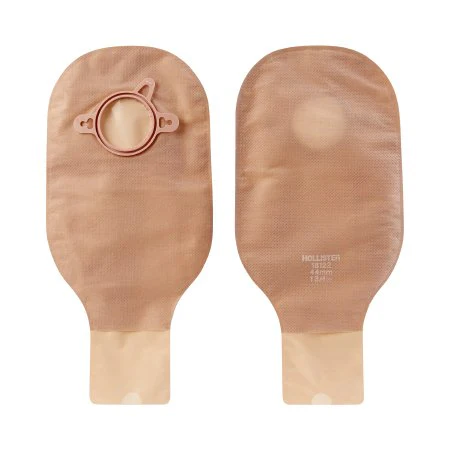
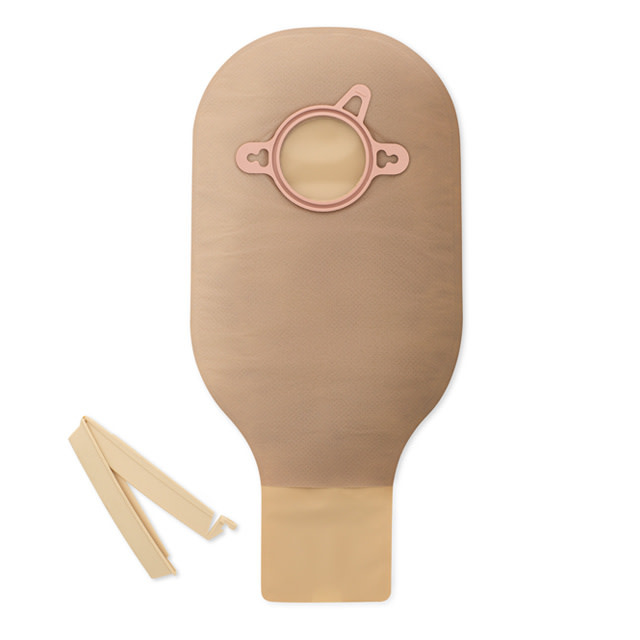
Slideshow Items

  • Ostomy Supplies
  • continence-ostomy/ostomy-supplies
  • Continence & Ostomy
  • continence-ostomy
HOL- Hollister

  |  

Hollister New Image Clamp Closure 12" Drainable Pouch Beige No Filter 1-3/4" Flange 10/Bx

C$80.00
In stock online
In store: Check availability

Available in store

SKU: 18122

This drainable pouch connects to 45mm (1¾") New Image barriers using traditional clamp closure for secure, customizable seal. Beige film provides privacy under clothing, while no-filter design suits watery output and gives you full odor control.

    • Why Traditional Clamp Closure Still Works

      While newer integrated closures like Lock 'n Roll have gained popularity, many experienced ostomy users prefer traditional clamp closures for good reasons: visible security (you can see the clamp is closed), tactile feedback that confirms proper closure, the ability to adjust closure tightness, and the familiarity of a time-tested method that's worked reliably for decades. Clamps are simple, effective, and give you complete control over your closure technique. The no-filter design complements this traditional approach—especially valuable for ileostomy users with watery output where filters can clog quickly or for those who prefer using pouch deodorants for odor management. Combined with discreet beige film and the flexibility of a two-piece system, this pouch provides straightforward, dependable ostomy management.

      Perfect for: Colostomy and ileostomy users with New Image 45mm barriers who prefer traditional clamp closure, have watery output, want visible closure security, use pouch deodorants, or appreciate time-tested reliability over newer closure technologies.

      Key Features

      Traditional clamp closure — time-tested external clamp provides secure, visible, adjustable seal
      45mm (1¾") coupling flange — connects to all New Image 45mm barriers
      12" MAXI length — extended capacity for fewer daytime empties
      Beige opaque film — discreet privacy; output not visible through pouch
      No-filter design — prevents clogging with liquid output; allows full control over odor management
      Low-rustle materials — quiet film won't draw attention under clothing
      Soft body-side comfort panel — gentle against skin for all-day wear
      Universal New Image 45mm compatibility — works with flat or convex, Flextend or CeraPlus barriers
      Two-piece convenience — change pouches without removing barrier
      Clamp typically included — ready to use out of the box
      ✓ Latex-free; sterile; single-patient use

      What You'll Appreciate

      Visible closure security — You can see the clamp is properly closed at a glance. No wondering if the integrated seal worked correctly—the visual confirmation provides peace of mind.

      Tactile feedback — Feel the clamp snap into place. The physical sensation of securing the clamp confirms proper closure, giving you confidence between empties.

      Adjustable tightness — Control how firmly the clamp secures the tail. Adjust for different output consistencies or personal preference—tighter for liquid output, looser if comfortable.

      Reliable time-tested design — Clamp closures have been the ostomy standard for decades. Proven reliability that generations of ostomy users have trusted.

      Easy to clean and maintain — Clamps are simple to rinse and keep clean. Remove for thorough washing if needed, then reapply.

      No-filter benefits for liquid output — Filters can clog quickly with ileostomy's watery output. No filter means no clogging issues, no filter maintenance concerns, and no premature pouch changes due to filter failure.

      Complete odor control — Without a filter that might vent prematurely, you have full control over odor management. Use your preferred pouch deodorants and emptying schedule for optimal odor control.

      Discreet beige film — Opaque film ensures complete privacy. Output is never visible through the pouch material, even with lighter-colored clothing.

      Two-piece flexibility — Change pouches every 1-3 days while keeping your barrier in place for 3-5 days, protecting your peristomal skin from frequent adhesive removal.

      How to Use

      Attaching the Pouch to Your Barrier:

      1. Ensure barrier is properly applied to clean, dry peristomal skin
      2. Remove pouch from packaging — sterile until opened
      3. Check that tail is clamped or have clamp ready to apply after attachment
      4. Align the coupling:
        • Hold pouch by its 45mm coupling flange
        • Position over barrier's coupling on your abdomen
        • Center carefully for proper alignment
      5. Snap into place:
        • Press pouch flange firmly onto barrier coupling
        • Work around entire circumference
        • Listen/feel for clicks as it locks into place
        • Tug gently to verify secure attachment
      6. Verify complete connection:
        • Run finger around entire coupling perimeter
        • Check for gaps or raised areas
        • Pouch should not detach with gentle pulling
      7. Ensure tail is clamped if not already closed

      Using the Clamp:

      Types of clamps:

      • Squeeze clamps — squeeze sides to open, release to close
      • Slide clamps — slide mechanism secures tail
      • Most common — plastic squeeze clamps with teeth or ridges

      Applying the clamp:

      1. Fold the tail:
        • Fold tail upward 2-3 times
        • Create multiple layers for better seal
        • Ensure tail is clean and dry for best closure
      2. Position the clamp:
        • Open clamp mechanism
        • Slide over folded tail
        • Center on the folded area
      3. Secure the clamp:
        • Close clamp firmly
        • Ensure teeth grip the folded tail
        • Should feel/hear secure engagement
      4. Verify closure:
        • Tug gently on tail
        • Clamp should hold firmly without slipping
        • No gaps where output could leak

      Clamp application tips:

      • Clean tail first — residue prevents good seal
      • Multiple folds — 2-3 folds create better security
      • Center clamp — position in middle of fold for best grip
      • Firm closure — don't be timid; clamp needs firm pressure
      • Check regularly — verify clamp remains secure throughout day

      Emptying Your Pouch:

      1. Empty when 1/3 to 1/2 full:
        • Don't wait until completely full
        • Heavy pouches stress the coupling
        • Empty more frequently with watery output
      2. Position for emptying:
        • Sit on toilet facing forward or backward
        • Standing works but sitting provides better control
        • Support pouch body with one hand
      3. Remove the clamp:
        • Open clamp mechanism (squeeze sides or slide release)
        • Remove completely from tail
        • Keep clamp in safe place (don't drop in toilet!)
        • Many users keep clamp in pocket or on sink edge
      4. Unfold the tail:
        • Carefully unfold the tail layers
        • Point opening away from you initially (in case of drips)
        • Unfold completely over toilet
      5. Direct into toilet:
        • Point tail opening into bowl
        • Don't let tail touch toilet water or bowl rim
        • Hold pouch body to control drainage
      6. Allow complete drainage:
        • Let output empty fully (30-60 seconds)
        • Gently squeeze pouch from top to bottom
        • Ensure thorough emptying
      7. Clean the tail:
        • Use toilet paper to wipe inside and outside of opening
        • Clean thoroughly—residue interferes with clamp seal
        • Wipe from inside out
        • Ensure tail is dry for good closure
      8. Refold and clamp:
        • Fold tail back up (2-3 folds)
        • Reapply clamp over folded area
        • Secure firmly
        • Verify clamp is holding
      9. Finish up:
        • Flush toilet
        • Wash hands thoroughly
        • Clean clamp if needed

      Important emptying tips:

      • Don't lose the clamp — keep it secure during emptying process
      • Clean tail well — proper cleaning ensures good resealing
      • Fold consistently — use same folding technique each time
      • Check clamp — verify it's secure before leaving bathroom

      Clamp Care and Maintenance:

      Daily care:

      • Rinse clamp with water during emptying if soiled
      • Wipe with toilet paper or tissue
      • Keep clean for hygiene and proper function

      Weekly care:

      • Wash clamp thoroughly with soap and water
      • Check for cracks or damage
      • Dry completely before reuse

      When to replace clamp:

      • Cracks or breaks in plastic
      • Teeth worn down (doesn't grip well)
      • Mechanism loose or doesn't close firmly
      • Generally every 1-3 months or as needed

      Extra clamps:

      • Keep spare clamps available
      • Carry one in purse/bag for emergencies
      • Have backup at home
      • Inexpensive and essential backup

      Changing the Pouch:

      1. Empty completely before removal — makes removal cleaner
      2. Remove and save clamp — reuse on new pouch
      3. Detach pouch from barrier:
        • Support barrier with one hand
        • Press down on one side of coupling
        • Lift opposite side to release
        • Work around to fully detach
      4. Dispose of used pouch:
        • Empty any remaining contents
        • Fold or roll pouch
        • Wrap in disposal bag or newspaper
        • Discard in regular trash
      5. Inspect barrier coupling — clean if needed, check for damage
      6. Attach fresh pouch following attachment steps
      7. Apply clamp to new pouch tail

      How Often to Change:

      • Drainable pouches: Every 1-3 days typically
      • Barriers: Every 3-5 days typically
      • Clamps: Every 1-3 months or when worn
      • Change pouch sooner if: strong odor persists, material shows wear, leakage occurs

      Understanding No-Filter Design

      Why this pouch has no filter:

      Filter purpose in general:

      • Vent gas from pouch
      • Neutralize odors with charcoal
      • Prevent ballooning

      Why no filter can be better:

      For watery/liquid output (ileostomy):

      • Prevents clogging — liquid output quickly clogs filter membranes
      • Avoids premature venting — clogged filters can cause uncontrolled venting
      • Eliminates filter failure — no filter means no filter-related pouch changes
      • Reduces maintenance — no filter to monitor or worry about

      For odor control preference:

      • Complete control — manage odor your way with deodorants
      • No premature venting — filters can release gas before you're ready
      • Works with drops — pouch deodorant drops work better without filter interference
      • Custom strategy — choose when and how to manage gas

      How to manage gas without filter:

      Burping the pouch:

      1. Go to bathroom or private area
      2. Hold pouch tail over toilet
      3. Open clamp slightly or unfold tail edge
      4. Allow gas to escape
      5. Reseal immediately
      6. Use this method as needed

      Using pouch deodorants:

      • Add deodorant drops to pouch after emptying
      • Helps neutralize odors without filter
      • Many products available (ask your ostomy nurse)
      • Typically 5-10 drops per emptying

      Dietary management:

      • Identify gas-producing foods
      • Moderate intake of beans, cabbage, onions, carbonated drinks
      • Eat slowly, chew thoroughly
      • Reduces gas production at source

      Regular emptying:

      • Don't let pouch fill completely
      • Empty before gas accumulates excessively
      • Frequent emptying reduces odor buildup

      No-Filter vs Filtered Pouches

      Understanding your options:

      No-Filter Pouches (This Product):

      Best for:

      • Ileostomy with watery, liquid output
      • Users who've had filter clogging issues
      • Those preferring complete odor control with deodorants
      • People wanting to manually manage gas
      • High-liquid output situations

      Advantages:

      • No clogging problems
      • No filter maintenance or failure
      • Works well with very liquid output
      • Compatible with all pouch deodorants
      • One less thing to monitor

      Considerations:

      • Need to burp pouch or manage gas manually
      • Should use pouch deodorants for odor
      • May experience ballooning if not burped regularly

      Filtered Pouches:

      Best for:

      • Colostomy with formed or semi-formed output
      • Users wanting automatic gas venting
      • Those with consistent, predictable output
      • People uncomfortable burping pouch

      Advantages:

      • Automatic gas release
      • Built-in odor neutralization
      • Reduces ballooning
      • Less manual intervention

      Considerations:

      • Can clog with liquid output
      • Filter failure requires pouch change
      • Some filters vent prematurely
      • May not work well with very liquid consistency

      How to decide:

      • Liquid output (ileostomy): Usually better with no-filter
      • Formed output (colostomy): Often prefer filtered
      • Past filter problems: Try no-filter option
      • Personal preference: Both work—choose what suits you

      Can you switch? Yes! Since both are New Image 45mm system, you can keep both types and use whichever suits your needs that day. Many users have both options available.

      Traditional Clamp vs Integrated Closures

      Comparing closure methods:

      Traditional Clamp (This Product):

      Advantages:

      • Visual security — see the clamp, know it's closed
      • Tactile feedback — feel when properly closed
      • Adjustable — control closure tightness
      • Time-tested — decades of proven reliability
      • Familiar — what many long-time users know
      • Replaceable — swap out worn clamps easily
      • Easy to verify — quick visual check confirms closure

      Considerations:

      • External accessory — clamp can be lost or forgotten
      • Bulk — slight additional bulk from clamp hardware
      • Two-hand operation — usually requires both hands to clamp
      • Carry extra — should have spare clamps available

      Integrated Closures (Lock 'n Roll, EasiClose, etc.):

      Advantages:

      • No clamps to lose — closure built into pouch
      • One-hand operation — can close with one hand
      • Slimmer profile — no external hardware
      • Simplified — fewer accessories to manage

      Considerations:

      • Less visible — can't see closure as clearly
      • Fixed design — can't adjust tightness
      • Technique required — need proper folding method
      • Some prefer clamps — familiarity and visibility valued

      Which is right for you?

      Choose clamp closure (this product) if you:

      • Want visible confirmation of closure
      • Prefer traditional, familiar methods
      • Like adjusting closure tightness
      • Don't mind managing clamp accessory
      • Value time-tested reliability

      Choose integrated closure if you:

      • Want simplest possible system
      • Prefer not carrying clamps
      • Like one-hand operation
      • Want slimmest possible profile

      Both work effectively—it's personal preference. Many experienced users prefer clamps; many newer users prefer integrated. Try both if possible to see which feels more comfortable and secure to you.

      Beige Film Benefits

      Why opaque beige film:

      Privacy and discretion:

      • Output not visible — complete privacy about pouch contents
      • Psychological comfort — many users prefer not seeing output
      • Clothing compatibility — works under light-colored clothing without show-through
      • Professional settings — more discreet in work environments
      • Social confidence — no concern about visibility

      When beige is preferred:

      • Everyday wear
      • Professional environments
      • Social situations
      • Light-colored or fitted clothing
      • Personal privacy preference
      • Don't need visual monitoring

      Transparent alternative: Some users prefer transparent for:

      • Medical monitoring needs
      • Learning ostomy management
      • Checking stoma visibility
      • Measuring output

      Most users choose beige for everyday wear due to privacy and discretion benefits.

      Troubleshooting Clamp Closure Issues

      "The clamp won't stay closed or keeps slipping."

      Possible causes:

      • Tail not cleaned properly — residue prevents grip
      • Insufficient folds — need 2-3 folds minimum
      • Worn clamp — teeth damaged or mechanism loose
      • Wrong clamp type — ensure clamp matches pouch tail size
      • Not closing firmly — needs firm pressure to engage

      Solution: Clean tail thoroughly, fold multiple times, press clamp firmly, replace if worn, ensure you have correct clamp for this pouch system.

      "The tail leaks around the clamp between empties."

      Check:

      • Is tail clean and dry? Moisture prevents good seal
      • Are you folding enough times? Need 2-3 folds
      • Is clamp positioned correctly? Should be centered on fold
      • Is clamp damaged? Check teeth and mechanism
      • Is output very liquid? May need to empty more frequently

      Solution: Improve tail cleaning, increase folds, verify proper clamp placement, replace if needed.

      "I keep losing my clamp."

      Prevention strategies:

      • Set down carefully — place on sink edge, not toilet rim
      • Use clip/lanyard — attach clamp to belt loop when emptying
      • Pocket storage — keep in pocket during emptying
      • Backup clamps — carry spare in purse/bag
      • Buy extras — inexpensive to have multiple backups

      Consider keeping clamps:

      • At home (main supply)
      • In purse/bag (emergency backup)
      • At work (if you work outside home)
      • In car (just in case)

      "The clamp is uncomfortable or creates bulk."

      Tips:

      • Position pouch — tuck tail downward or to side
      • Choose low-profile clamps — some designs slimmer than others
      • Wear support garments — ostomy wraps can smooth profile
      • Consider integrated closure pouches — eliminate clamp bulk entirely

      "How tight should the clamp be?"

      Guidelines:

      • Firm enough to prevent leaks
      • Not so tight it damages pouch material
      • Adjust based on output — tighter for liquid, looser if comfortable
      • Test by tugging — should hold securely without slipping
      • Personal preference — find what works for you

      Two-Piece System with 45mm Coupling

      Understanding the 45mm size:

      Coupling sizes available:

      • 45mm (1¾") — this product
      • 57mm (2¼") — medium size
      • 70mm (2¾") — larger size

      Why 45mm?

      Best for:

      • Smaller stomas
      • Stomas in certain body locations
      • Users wanting smallest possible coupling
      • Children or petite adults

      Advantages:

      • Smallest profile — least bulk from coupling
      • Discreet — minimal hardware visible
      • Lighter — less weight from coupling system

      Considerations:

      • Limited to 45mm products — must use matching coupling size
      • Smaller opening — may not suit very large stomas

      How to know your coupling size:

      • Check your current barrier packaging
      • Should be marked clearly (45mm, 57mm, or 70mm)
      • If unsure, ask ostomy nurse or check product numbers

      Important: Pouches must match barrier coupling size. This 45mm pouch only works with 45mm barriers. Don't mix coupling sizes.

      New Image 45mm barriers include:

      • Flat cut-to-fit barriers
      • Flat pre-cut barriers
      • Convex barriers (shallow and deep)
      • Flextend or CeraPlus adhesive options

      All New Image 45mm barriers work with this 45mm pouch.

      Technical Specifications

      Product Name: Hollister New Image Drainable Ostomy Pouch
      System: Two-piece with plastic coupling flange
      Manufacturer: Hollister Incorporated

      Coupling/Flange:

      • Size: 45mm (1¾ inches) diameter
      • Type: Snap-on plastic coupling
      • Compatibility: All Hollister New Image 45mm barriers (flat, convex, Flextend, CeraPlus)
      • Security: Audible click confirmation when attached

      Pouch Design:

      • Type: Drainable
      • Length: 12 inches (MAXI class)—extended capacity
      • Closure: Traditional external clamp (typically included)
      • Film: Beige opaque—output not visible
      • Filter: None (no-filter design)

      Materials:

      • Film: Medical-grade odor-barrier film
      • Noise level: Low-rustle, quiet materials
      • Body-side panel: Soft comfort panel against skin
      • Latex: Not made with natural rubber latex (latex-free)

      Closure System:

      • Type: External clamp
      • Clamp included: Typically yes (verify with specific SKU)
      • Clamp type: Usually plastic squeeze or slide clamp
      • Reusable: Clamps can be cleaned and reused multiple times
      • Replacement: Every 1-3 months or as needed

      No-Filter Design:

      • No integrated charcoal filter
      • Gas management via manual burping or pouch deodorants
      • Ideal for liquid output that would clog filters
      • Prevents filter-related failures

      Capacity:

      • 12-inch MAXI length provides extended capacity
      • Fewer empties needed during day
      • Designed for 3-6 hours between empties typically

      Wear Time:

      • Pouch: Change every 1-3 days typically
      • Barrier: Keep in place 3-5 days typically
      • Ratio: Change 2-3 pouches per barrier cycle

      Sterility and Use:

      • Sterility: Individually packaged sterile
      • Use: Single-use, disposable
      • Patient: Single-patient use only
      • Shelf life: Check package for expiration date

      Packaging: 10 pouches per box
      Storage: Store in cool, dry place; keep sealed until use

      Suitable For: ✓ Colostomy
      ✓ Ileostomy
      ✓ Users preferring traditional clamp closure
      ✓ Those with liquid output (no-filter benefit)
      ✓ Anyone using New Image 45mm barriers
      ✓ Users wanting visible closure security
      ✓ Those comfortable with traditional closures

      Ordering Guidance

      When to choose this pouch:

      • You're using Hollister New Image 45mm barriers
      • You prefer traditional clamp closure
      • You want no-filter design (liquid output or use deodorants)
      • You need drainable pouch with 12" MAXI length
      • You value time-tested closure reliability

      Confirming compatibility:

      1. Check your current barrier — must be Hollister New Image 45mm
      2. Verify coupling size — look for 45mm marking on barrier packaging
      3. If uncertain — consult ostomy nurse or check barrier product number

      What's included:

      • 10 pouches per box
      • Clamp typically included (verify specific SKU)
      • If clamps not included, order separately

      Product variations:

      This product specifications:

      • Coupling: 45mm
      • Length: 12" MAXI
      • Film: Beige opaque
      • Filter: No filter
      • Closure: External clamp

      Other New Image options available:

      • Different coupling sizes (57mm, 70mm)
      • Different closures (integrated Lock 'n Roll)
      • Filtered versions
      • Transparent film options
      • Different lengths (shorter options)

      Quantity considerations:

      Typical usage:

      • Change drainable pouch every 1-3 days
      • 10-30 pouches per month
      • One box (10 pouches) = 10-30 days supply

      Complete system needs:

      • Barriers: 6-10 per month (changed every 3-5 days)
      • Pouches: 10-30 per month (changed every 1-3 days)
      • Clamps: 1-4 per month (replaced as worn)

      Clamp supply:

      • Keep 3-5 clamps on hand minimum
      • Have backups in multiple locations
      • Inexpensive to stock extras
      • Order with pouches if not included

      Insurance coverage:

      • Most plans cover ostomy supplies with prescription
      • Coverage typically 1-2 pouch changes per day
      • Work with ostomy supply company for insurance coordination

      First-time traditional clamp users: If you're switching from integrated closures to clamps:

      • Ask ostomy nurse for demonstration
      • Practice clamp technique at home first
      • Give yourself time to get comfortable
      • Keep both types available initially to compare

      Pro tip: Even if you primarily use integrated closure pouches, keep a box of clamp-closure pouches on hand. Some users prefer clamps for certain situations (travel, high-output days, extra security needs). Having both options provides flexibility for different circumstances.

      For questions about clamp closure technique, troubleshooting closure issues, or selecting between closure types, consult with your ostomy care nurse or contact Hollister customer service for guidance and support.

    • No reviews yet

      Add yours

    Testimonials from Google

    See all reviews

    Recently viewed

    Your cart — 0

    You cart is currently empty

    Login