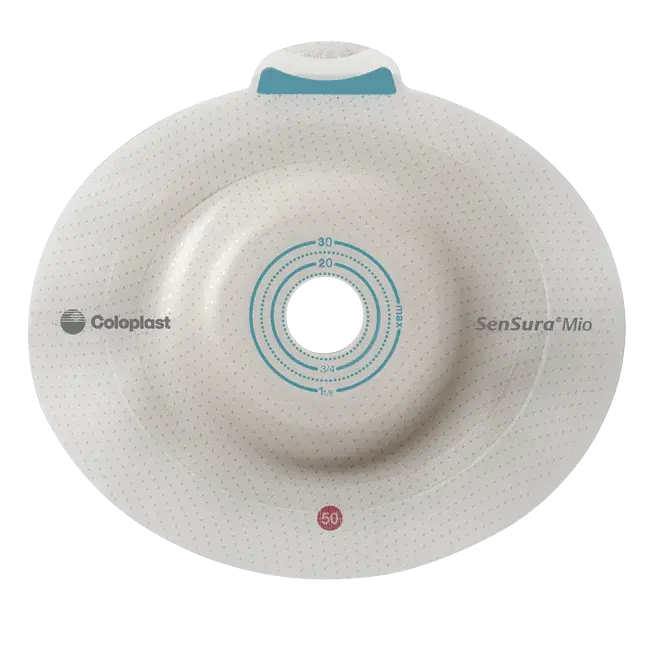
Why Deep Convex for Retracted or Challenging Stomas
Deep Convex barriers provide firm, rigid pressure around the stoma to help it protrude above skin level, creating a more favorable anatomy for secure pouching. This is essential for retracted or flush stomas where the stoma opening sits at or below the surrounding skin surface, making reliable sealing with flat or soft convex barriers difficult or impossible. The rigid convex shape pushes into the peristomal area, effectively "lifting" the stoma while creating a smooth, level surface for the adhesive to bond to. The pre-cut 28 mm opening eliminates cutting variability and ensures consistent fit, while the elastic SenSura Mio adhesive works with the convex pressure to maintain seal integrity. The Click mechanical coupling provides audible confirmation of secure pouch attachment, critical for users who need maximum confidence in their system.
Key Features & Benefits
- Deep convex design provides firm, rigid pressure to help retracted stomas protrude
- Pre-cut 28 mm opening ensures consistent sizing without cutting required
- 50 mm Click coupling with audible confirmation provides secure mechanical attachment
- Elastic SenSura Mio adhesive adapts to body movement while maintaining seal
- Rigid convex shape creates level surface for improved barrier adhesion
- Click system eliminates guesswork—hear and feel secure connection
- Skin-friendly materials balance convex pressure with skin protection
- 2-piece system allows pouch changes without removing barrier
- Compatible exclusively with SenSura Mio Click 50 mm pouches
- Box of 5 barriers supports 2–4 weeks of management
Clinical Applications
Appropriate for:
✓ Colostomy or ileostomy patients with retracted or flush stomas ✓ Stomas sitting at or below skin surface level ✓ Deep skin folds or creases preventing flat/soft convex seal ✓ Patients experiencing persistent leakage with flat or soft convex barriers ✓ Post-surgical retraction requiring convex support ✓ Peristomal hernias or prolapse requiring firm support (with clinical approval) ✓ Users needing maximum security and leak prevention ✓ Active individuals requiring reliable seal during physical activity
Important: Deep convex applies firm pressure and is not appropriate for all users. Never use deep convex without healthcare provider approval. May cause tissue trauma if used incorrectly. Consult with ostomy nurse for proper product selection, fitting, and monitoring.
Usage & Application - Patient Guidance
For Deep Convex Barrier Application Under Healthcare Provider Direction: This deep convex barrier applies significant pressure around the stoma and should only be used as directed by your healthcare provider or ostomy nurse. Proper training and regular monitoring are essential for safe use.
Understanding Deep Convex Barriers:
- Purpose: Apply firm pressure to help retracted stomas protrude above skin level
- Pressure: Significantly more rigid than soft convex—creates definite indentation
- Placement: Must be positioned correctly to avoid tissue damage
- Monitoring: Requires regular skin checks for pressure points or injury
Critical Safety Warnings:
- Never use deep convex without healthcare provider approval
- Discontinue immediately if experiencing pain, excessive pressure, or skin breakdown
- Regular monitoring essential—check skin at every barrier change
- Not for everyone—some stomas/skin conditions contraindicate deep convex use
- Orientation critical—improper positioning can cause tissue damage
When Deep Convex is Appropriate:
- Stoma consistently sits at or below skin surface
- Flat and soft convex barriers have failed to prevent leakage
- Ostomy nurse has assessed and recommended deep convex
- No contraindications (fragile skin, recent surgery, certain hernias)
- Patient able to tolerate firm pressure
- Regular follow-up monitoring possible
Preparation:
- Gather supplies: deep convex barrier, pouch, measuring guide (to verify 28 mm is correct)
- Remove old barrier and pouch carefully
- Clean stoma and peristomal skin gently with warm water
- Pat skin completely dry
- Inspect skin carefully for any pressure marks, redness, or breakdown from previous wear
- Report any skin concerns to healthcare provider before applying new barrier
Verifying Correct Size:
- This is a pre-cut 28 mm barrier (not adjustable)
- Measure stoma to confirm 28 mm opening is appropriate
- Opening should be approximately same size as stoma (within 1/8")
- If stoma measures significantly different than 28 mm, contact ostomy nurse for different size
- Do not use if opening is too small (can damage stoma) or too large (exposes skin)
Understanding Convex Orientation:
- Deep convex barriers have specific "top" and "bottom" orientation
- Check product packaging for orientation markers
- Convex curve should align with body position (typically deeper at bottom)
- Incorrect orientation reduces effectiveness and increases injury risk
- Follow ostomy nurse instructions for your specific anatomy
Application Technique:
- Warm barrier between hands for 30–60 seconds
- Remove protective backing from adhesive
- Stand or sit in position recommended by ostomy nurse
- Center pre-cut opening over stoma carefully
- Apply with firm, steady pressure starting at stoma
- Press convex ring firmly into peristomal area—this will create indentation
- Work outward from stoma in circular motion
- Apply significantly more pressure than with flat barriers
- Hold firm pressure for 2–3 minutes
- The convex should create visible indentation in peristomal skin
- Ensure entire adhesive edge is well-sealed
- Check that convex pressure is evenly distributed
Attaching the Click Pouch:
- Ensure barrier flange (50 mm) is clean, dry, and free from output
- Align pouch Click coupling (50 mm) with barrier coupling
- Press firmly around entire coupling ring
- Listen for audible "CLICK" confirming secure lock
- Feel for tactile confirmation of engagement
- Gently tug on pouch to verify secure connection
- If no click heard, remove and reattach until click confirms lock
- Run finger around entire coupling to ensure complete seal
Monitoring for Pressure Issues:
- Check skin at every barrier change for pressure marks
- Light redness that fades within 30 minutes is normal
- Persistent redness, blistering, bruising, or tissue breakdown is NOT normal
- Deep indentations that don't resolve indicate excessive pressure
- Report any concerning skin changes immediately
- May need adjustment to different convex depth or soft convex instead
Barrier Changing Schedule:
- Change barrier every 3–5 days or as recommended
- Deep convex users may need more frequent changes initially (every 2–3 days)
- Change immediately if experiencing pain or pressure discomfort
- Change if skin shows signs of excessive pressure
- Never wear longer than recommended by healthcare provider
Removing the Barrier:
- Remove pouch first by pressing Click release mechanism
- Support skin with one hand while gently peeling barrier
- Remove slowly—deep convex creates stronger adhesion
- Use barrier removal spray or wipes if recommended
- Remove in direction of hair growth when possible
- Clean any adhesive residue gently
- Allow skin to rest briefly before reapplying if possible
Skin Assessment After Removal:
- Inspect entire peristomal area carefully
- Look for pressure marks, redness, blistering, or breakdown
- Check areas where convex was deepest
- Light indentation that fades quickly is expected
- Deep, persistent marks or tissue damage requires immediate attention
- Document any concerns and report to healthcare provider
- May need photos to share with ostomy nurse if concerns arise
Signs Deep Convex May Not Be Appropriate:
- Persistent pain or discomfort during wear
- Skin breakdown despite proper application
- Deep pressure marks that don't resolve
- Increasing rather than decreasing leakage
- Patient unable to tolerate pressure
- Skin too fragile for firm convex pressure
Alternative Options if Deep Convex Causes Problems:
- Soft convex (gentler pressure, often sufficient)
- Barrier rings or seals for additional support
- Different convex depth or shape
- Convex inserts with flat barriers
- Combination products tailored to specific anatomy
When to Contact Healthcare Provider or Ostomy Nurse:
- Any pain or excessive discomfort from convex pressure
- Persistent skin redness, marks, or breakdown
- Blistering or tissue damage in pressure areas
- Leakage despite deep convex use
- Stoma bleeding beyond slight spotting
- Change in stoma appearance or retraction severity
- Difficulty achieving Click coupling connection
- Questions about whether deep convex is still appropriate
- Need for convex depth or size adjustment
Product Specifications
- Brand: Coloplast
- Product Line: SenSura Mio Click
- System Type: 2-Piece Skin Barrier
- Convexity: Deep Convex (rigid, firm pressure)
- Opening: Pre-Cut 28 mm (not adjustable)
- Flange Size: 50 mm
- Coupling Type: Click mechanical with audible confirmation
- Adhesive: Elastic SenSura Mio skin-friendly adhesive
- Wear Time: 3–5 days per barrier (may be shorter initially)
- Materials: Medical-grade convex ring, hydrocolloid adhesive, latex-free
- Compatibility: SenSura Mio Click pouches (50 mm coupling only)
- Quantity: Box of 5 skin barriers
- Stoma Types: Colostomy, ileostomy
- Best For: Retracted or flush stomas requiring firm convex support
- Profile: Deep convex (rigid)
- Orientation: Follow product marking for correct positioning